Quantcast
Channel: StackStorm
Viewing all 302 articles
Browse latest View live

Build or Integrate Your Own Operational Dashboard w/ StackStorm (guest blog)

$
0
0

November 26, 2015
by Anthony Shaw of Dimension Data

This tutorial will show you how to leverage the power of the StackStorm API to expose your fantastic new workflows built using the Flow (available to Enterprise Edition uses) by following one of the blogs.

In our fictional scenario, we have built 2 complex workflows.

  1. Engage Tractor Beam, this workflow deploys some virtual machines to cloud, uses Hubot to notify the staff and then Puppet to drive the tractor beam.
  2. Open/Close loading bay doors, this workflow takes the desired state of the doors to drive another workflow.

We want to provide our technical operations team with a really simple UI where they can just click these buttons and we hide the magic behind the scenes.

Starting off

First off, this is a tutorial for ASP.NET 4.5, MVC 5 and WebAPI 2.0, the latest Microsoft Web Development toolkit.

If you want to use another stack, you can follow the patterns here to repeat in another language.

Opening up Visual Studio (here I am using 2013, 2015 would also work), select the ASP.NET Web Application template
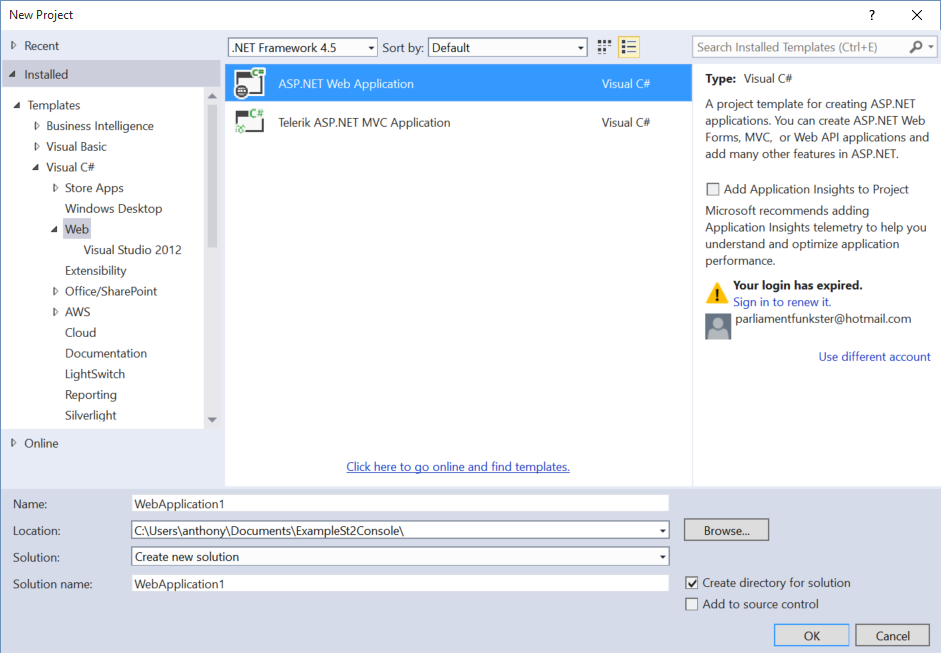
stackstorm-Capture-1

When prompted, pick out the Single Page Application option, this will install a whole smorgasbord of web-development tools.
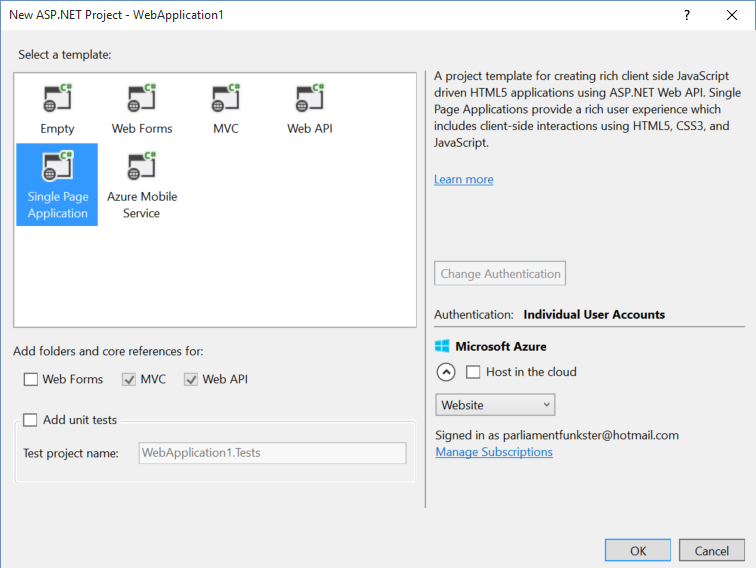
stackstorm-Capture-2

I’m not going to rely too heavily on these, but if you go ahead and press F5, it’ll present you with a login screen.

Inside the project Microsoft have already installed a user database and given you a registration system, so you can sign up to your new application by filling in your details.

If you want to replace this authentication mechanism with Active Directory (a more likely replacement in a large org), the provide detailed guides in the readme.
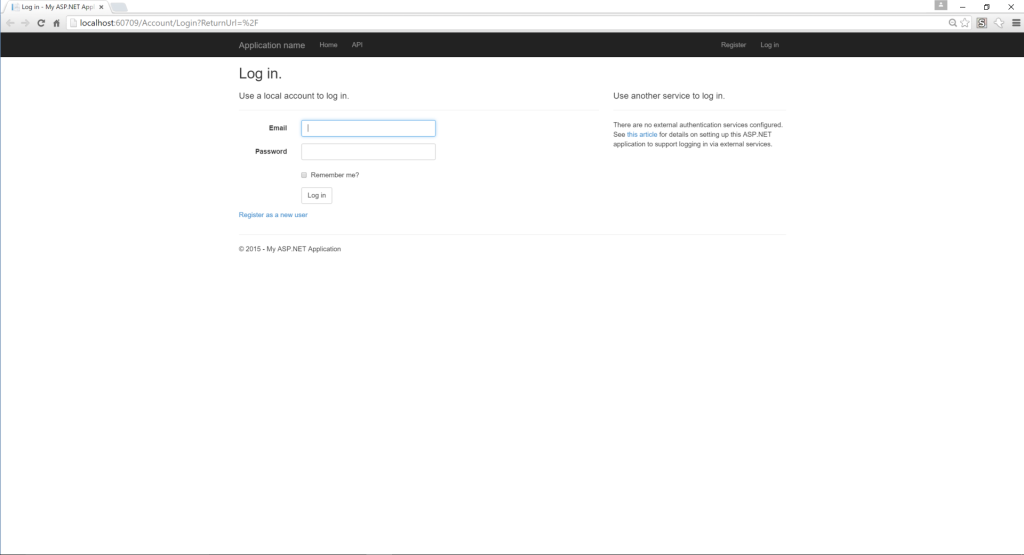
stackstorm-Capture2

At the registration page, fill in some details to get yourself started with your application.
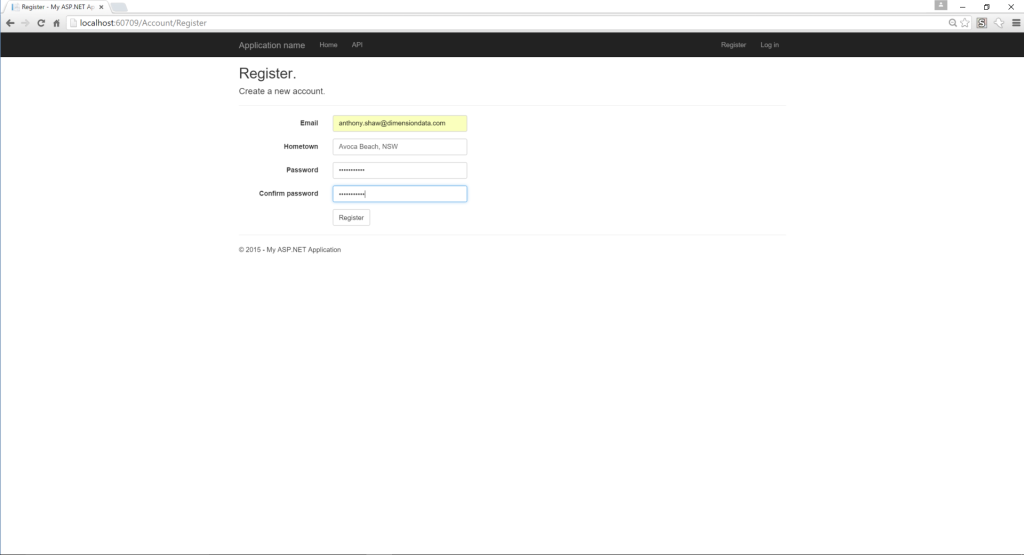
stackstorm-Capture3

Now you’re logged in, you’re greeting with this rather useless welcome page.
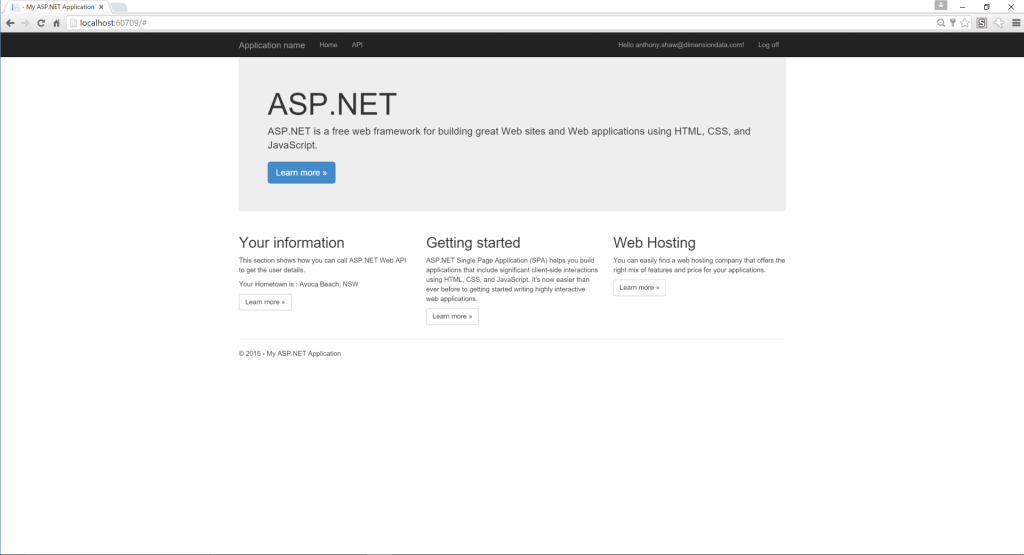
stackstorm-Capture4

Installing StackStorm API Client

In Visual Studio, 3rd party packages are distributed via nuget.org. I’ve been sharing a nuget package for the StackStorm API so I’ll show you in this tutorial how to use it.

The package is available on nuget.org

To install the package into your project either use the Nuget Package Manager Console

Install-Package St2.Client

Or using the GUI you can search for St2.Client under the nuget.org repository and click install.
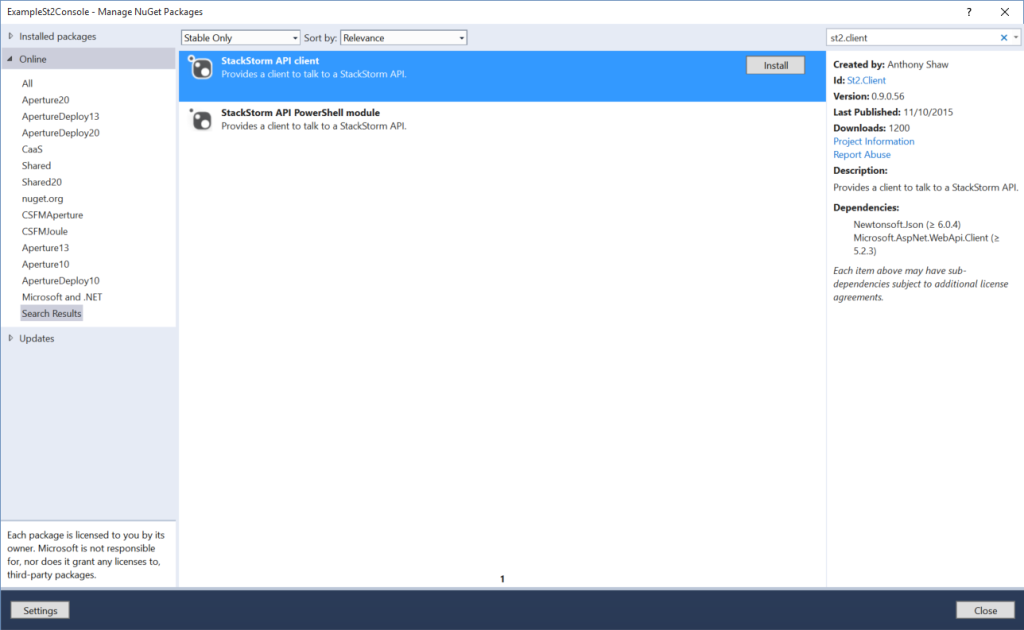
stackstorm-Capture5

Simple Example

Now we want to setup a quick API to provide a basic function, so under your controllers directory, add a new controller called ActionController (it will run our actions)
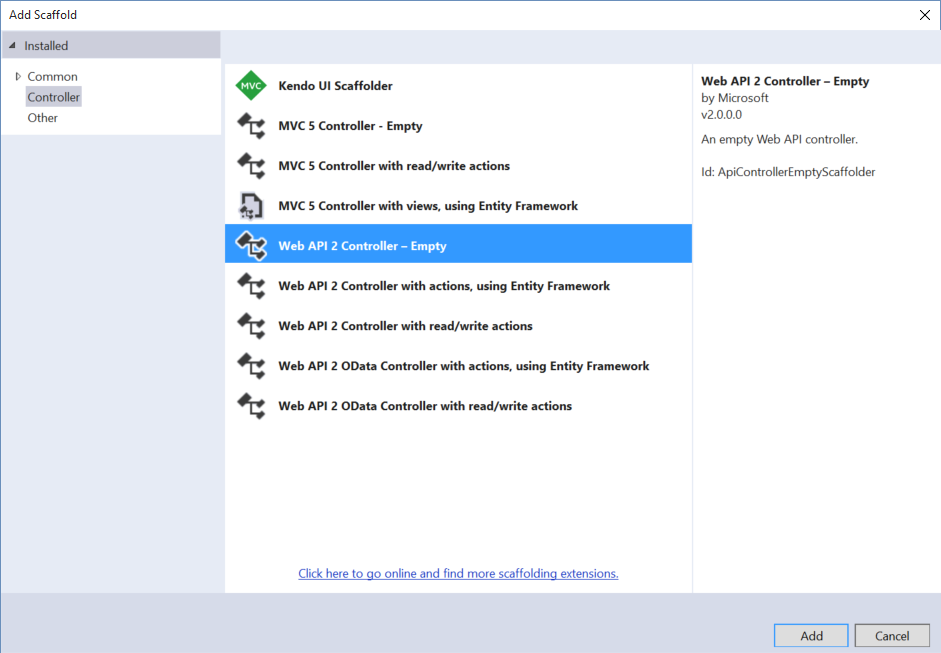
stackstorm-Capture6

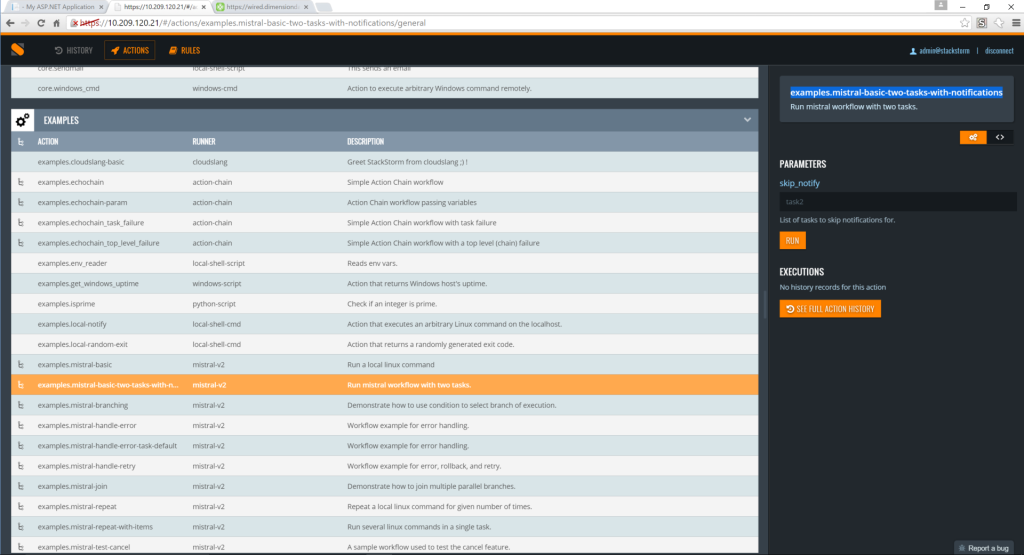
Back in the StackStorm UI you will already have access to the Examples pack, under this pack you will see a complex workflow action called “examples.mistral-basic-two-tasks-with-notifications”.

That is going to be our first action, since it requires no inputs and works every time.
stackstorm-Capture7

In ActionController.cs let’s write some code to call that workflow as a REST API.

using System.Collections.Generic;
using System.Threading;
using System.Threading.Tasks;
using System.Web.Http;
using System.Web.Http.Results;
using TonyBaloney.St2.Client;
using TonyBaloney.St2.Client.Models;

namespace ExampleSt2Console.Controllers
{
    [RoutePrefix("api")]
    public class ActionController : ApiController
    {
        private St2Client _st2Client;

Now, you want to connect to the StackStorm API, so fill in these details of your server. In production you would most likely use an IoC container and inject an ISt2Client instance based on a configuration file, but I’m not going to bore you with how to do that now.

public ActionController()
{
    _st2Client = new St2Client(
        "https://10.209.120.21:9100", // Auth URL 
        "https://10.209.120.21:9101", // API URL
        "admin",
        "DevAdmin123",
        true); // ignore certificate validation - if using self-signed cert
}

If you did you and setup a proper certificate when you installed StackStorm, set that last parameter to false.

Now, create a WebAPI action method to engage the tractor beam.

       [Route("tractor/engage")]
        [HttpPost]
        public async Task<JsonResult<Execution>> EngageTractorBeam()
        {
            // Get a sign-on token
            await _st2Client.RefreshTokenAsync();

            // Any parameters needed for our action
            Dictionary<string, object> actionParameters = new Dictionary<string, object>();

            // Run our action
            var result = await _st2Client.Executions.ExecuteActionAsync(
                "examples.mistral-basic-two-tasks-with-notifications",
                actionParameters);

            return Json(result);
        }

    }
}

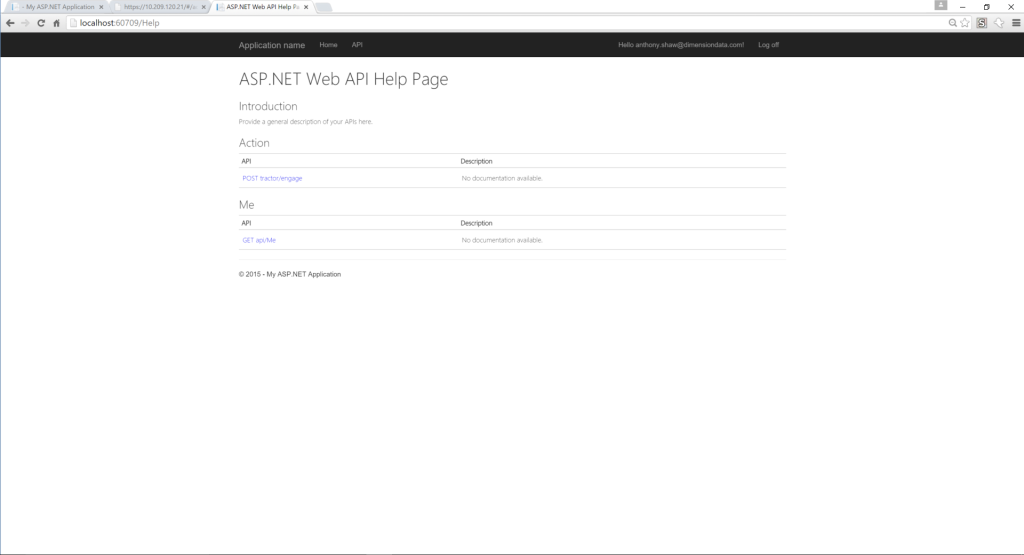
Now, debug your application by pressing F5 and go to the API link at the top, you’ll see that WebAPI has documented your new method, so you know it works.
stackstorm-Capture8

Back in Visual Studio, edit the home page contents (Views/Home/_Home.cshtml) to add a link to a function.

<!-- ko with: home -->
<div class="jumbotron">
    <h1>Rebel Alliance Operations Dashboard</h1>
    <p class="lead">This is a dashboard for the technical operations team in the rebel alliance.</p>
    <p><a href="http://starwars.net" class="btn btn-primary btn-lg">Learn more &raquo;</a></p>
</div>
<div class="row">
    <div class="col-md-6">
        <h2>Ship Engagement</h2>
        <p>Actions related to foreign ship engagement.</p>
        <p data-bind="text: myHometown"></p>

        <p><a data-bind="click: engageTractorBeam" class="btn btn-default" href="#">Engage Tractor Beam &raquo;</a></p>
    </div>
    ...
</div>

<!-- /ko -->

Now in Scripts/app/home.viewmodel.js if you edit the file and add our action to call the API.

function HomeViewModel(app, dataModel) {
    var self = this;

    self.myHometown = ko.observable("");

    Sammy(function () {
        this.get('#home', function () {
            // Make a call to the protected Web API by passing in a Bearer Authorization Header
            $.ajax({
                method: 'get',
                url: app.dataModel.userInfoUrl,
                contentType: "application/json; charset=utf-8",
                headers: {
                    'Authorization': 'Bearer ' + app.dataModel.getAccessToken()
                },
                success: function (data) {
                    self.myHometown('Your Hometown is : ' + data.hometown);
                }
            });
        });
        this.get('/', function () { this.app.runRoute('get', '#home') });
    });

    self.engageTractorBeam = function() {
        $.ajax({
            method: 'post',
            url: '/api/tractor/engage',
            contentType: "application/json; charset=utf-8",
            headers: {
                'Authorization': 'Bearer ' + app.dataModel.getAccessToken()
            },
            success: function (data) {
                alert('engaged!');
            }
        });
    }
    ...

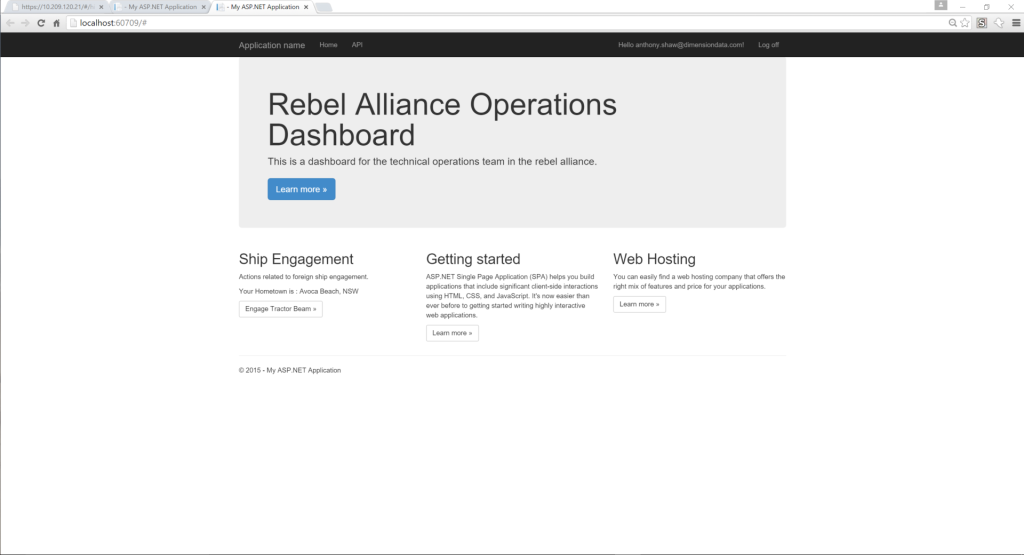
Hit F5 then you’ll see we have our nice dashboard
stackstorm-Capture9

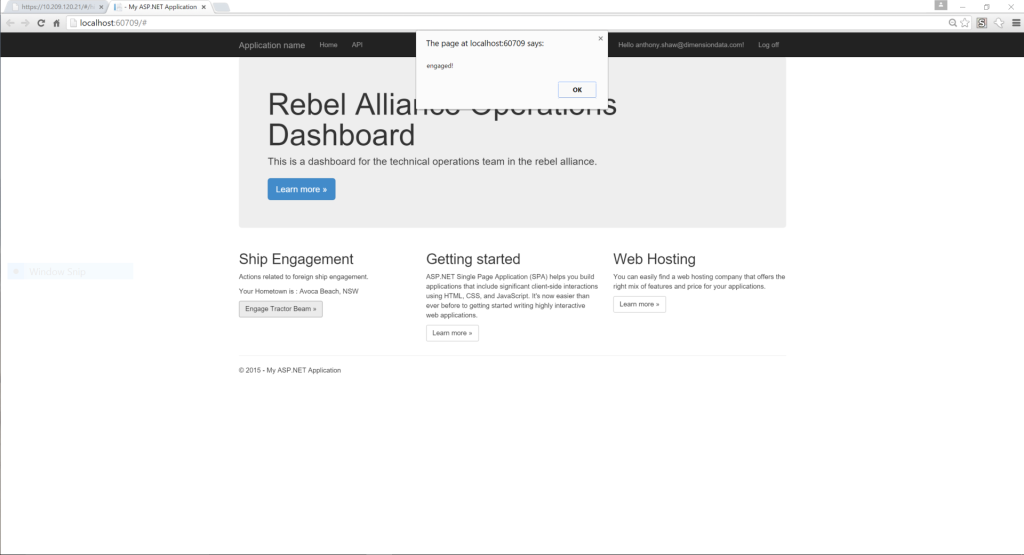
and click that button to engage the tractor beam.
stackstorm-Capture10

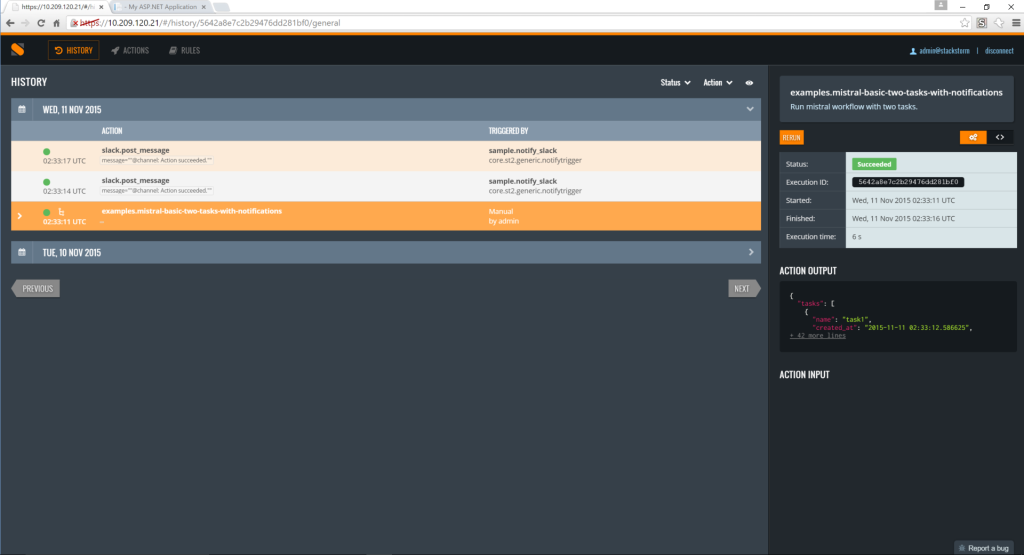
There it goes, now let’s checkout the StackStorm UI and make sure that actually ran our workflow. In the history window you’ll see it. Check out the output and make sure it was successful.stackstorm-Capture11
Complex Example

Let’s work on a more complex example, we have an action, “exampes.mistral-basic” that requires a parameter, cmd, which is the command to run.

Let’s use that command to open and close our loading bay doors

...
    <div class="col-md-6">
        <h2>Ship Engagement</h2>
        <p>Actions related to foreign ship engagement.</p>
        <p data-bind="text: myHometown"></p>

        <p><a data-bind="click: engageTractorBeam" class="btn btn-default" href="#">Engage Tractor Beam &raquo;</a></p>
    </div>

    <div class="col-md-6">
        <h2>Loading Bay Doors</h2>
        <p>
            Operations related to the loading bay doors.
        </p>
        <p><a data-bind="click: openLoadingDoors" class="btn btn-success" href="#">Open &raquo;</a></p>
        <p><a data-bind="click: closeLoadingDoors" class="btn btn-warning" href="#">Close &raquo;</a></p>
    </div>
...

Back in the view model, call the new API methods to include a data in the POST message with the desired door state.

...
self.openLoadingDoors = function () {
    $.ajax({
        method: 'post',
        url: '/api/doors/set',
        headers: {
            'Authorization': 'Bearer ' + app.dataModel.getAccessToken()
        },
        data: '=open' ,
        success: function (data) {
            alert(data.status);
        }
    });
}
self.closeLoadingDoors = function () {
    $.ajax({
        method: 'post',
        url: '/api/doors/set',
        headers: {
            'Authorization': 'Bearer ' + app.dataModel.getAccessToken()
        },
        data: '=close',
        success: function (data) {
            alert(data.status);
        }
    });
}
...

Then finally we’ll add our new API action controller

...
[Route("doors/set")]
[HttpPost]
public async Task<JsonResult<Execution>> SetDoorState([FromBody]string state)
{
    // Get a sign-on token
    await _st2Client.RefreshTokenAsync();

Now you need to assemble the collection of parameters for the action, this is a dictionary for convenience

// Any parameters needed for our action
// NB: This is really really really insecure. Just an example!
Dictionary<string, object> actionParameters = new Dictionary<string, object>
{
    {"cmd", "echo 'Setting doors to " + state + "'"}
};

Then run the action using the same function as before.

// Run our action
Execution result = await _st2Client.Executions.ExecuteActionAsync(
    "examples.mistral-basic",
    actionParameters);

string executionId = result.id;

This time, instead of just firing back the execution reference, let’s wait for it to finish.

    // Wait to complete.
    while (result.status == "running" || result.status == "requested") 
    {
        result = await _st2Client.Executions.GetExecutionAsync(executionId);

        Thread.Sleep(20);
    }

    return Json(result);
}

Now hit F5 and test it out. Click Open to test the function..
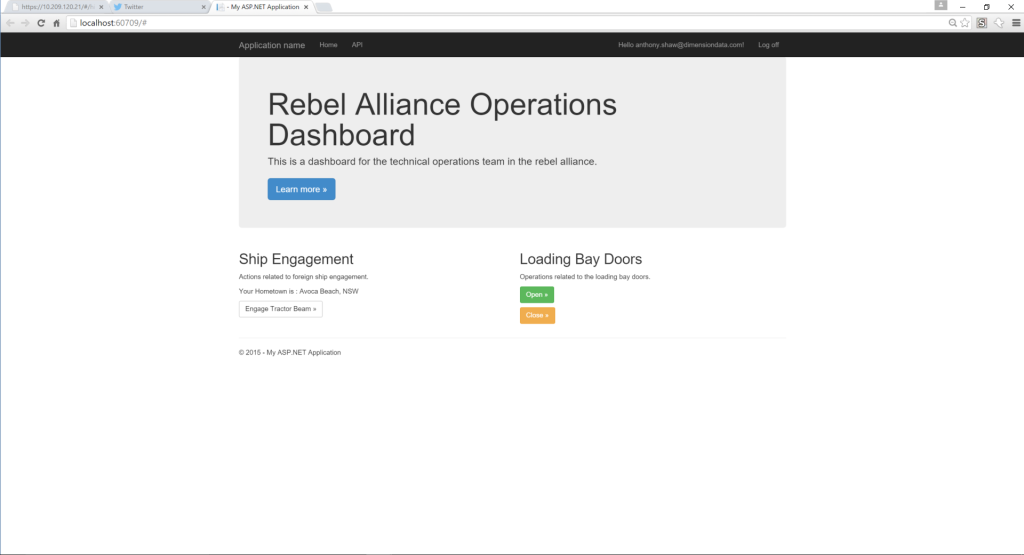
stackstorm-Capture12


stackstorm-Capture14


Check in StackStorm UI to make sure it succeeded.
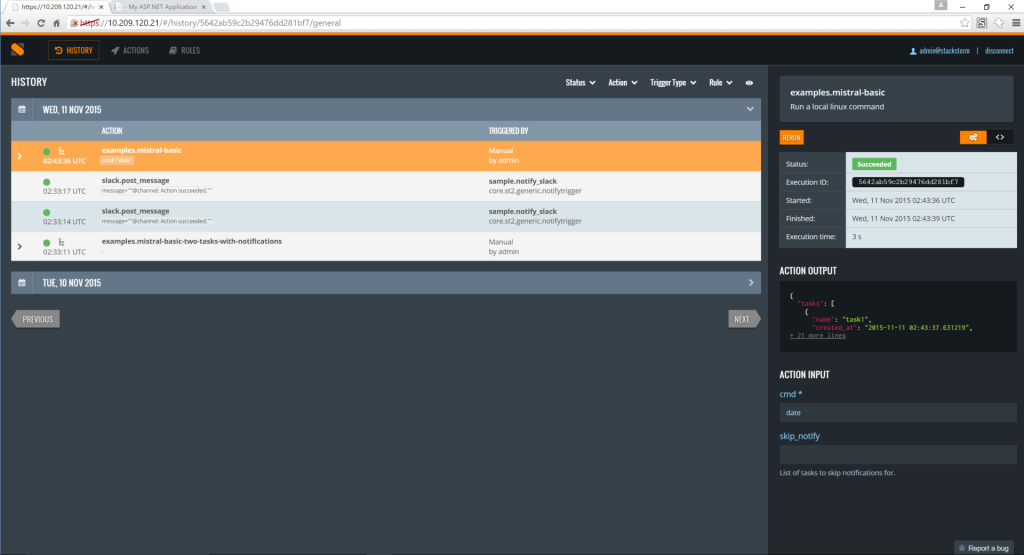
stackstorm-Capture13


And if you expand the result data on the right-hand panel you can see the full result.
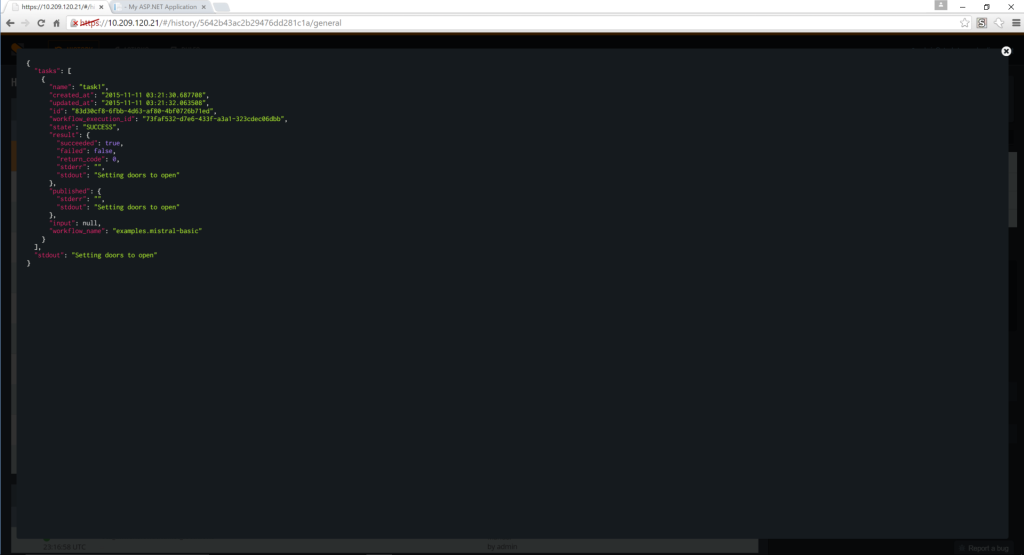
stackstorm-Capture15

This toolkit gives you a way of interfacing with StackStorm from .NET, if you’re using PowerShell or want to script these actions, checkout my PowerShell command library for StackStorm on powershellgallery.com

Happy hacking.

p.s. StarWars is copyright of LucasFilm/Disney.


The post Build or Integrate Your Own Operational Dashboard w/ StackStorm (guest blog) appeared first on StackStorm.


Auto-Remediation: Getting Started

$
0
0

December 2, 2015
by Patrick Hoolboom

On the latest Automation Happy Hour we talked with engineers from Netflix about auto-remediation. A good portion of the discussion was around how to get started. This got me thinking that I should probably take a moment to go over this topic a bit.

People tend to overanalyze auto-remediation. It seems there is a mentality that they must automate away all of their problems on day one. This type of thinking frequently leads to analysis paralysis. They deadlock on trying to decide what to automate.  In this article I am going to outline two of the best ways I have found to get people started in auto-remediation.  Facilitated troubleshooting and simple monitoring events.

Why Auto-Remediate?

Auto-remediation is more than a band-aid for poorly implemented infrastructure or applications.  Servers go down, processes hang, outages happen.  It provides a significant reduction in time to resolution and allows the team to focus more on root cause analysis to prevent future outages.  It helps alleviate pager fatigue and let’s people focus more on the important task of improving the applications or infrastructure.  Leveraging an event driven automation platform such as StackStorm also gives better visibility into what is and isn’t working in your process.  Let the machines mitigate the event so you can focus on making sure it doesn’t happen again.

Facilitated Troubleshooting

An easy way to get started is to NOT remediate right away. Your team may not be sold on fully automated resolutions yet.  Facilitated troubleshooting gives you a good way to show value from automation while still allowing a person to perform the final remediation action.   Auto-remediation is really broken into two pieces, diagnostic workflows and remediation workflows.  Facilitated troubleshooting is running the diagnostic workflow automatically, and the remediation workflow manually. These workflows collect information about the event, to better prepare the person who will respond to the page.

When an event fires, collect a lot more data about that event. Think about the things you would check if you were woken up by the page.  These steps will become the tasks in your diagnostic workflow.  These types of workflows are handy as they allow you to execute more expensive or long running checks. This lets you keep your monitoring system lean and mean but still get the necessary information during an event. Take this data and share it with the on call engineers or team as you see fit (chat, ticket, email, etc).  Include suggested next steps or additional workflows they may run to help reduce time to resolution even more.

KISS

When you are ready to auto-remediate, start with the low hanging fruit. Automate the easy things in order to identify the proper patterns for you and your organization. Some examples of easy tasks:

  • Restarting a dead/hung process
  • Clearing disk space
  • Removing unused volumes or VMs

Nir Alfasi from Netflix spoke of automating the remediation of health checks for service discovery. This is a great example of a simple remediation.

Does service discovery think the node is down?

  1. Check health of the instance
  2. Attempt to reboot if unhealthy
  3. Attempt to clear the health check if node is healthy
  4. If all else fails, escalate!

Another example would be a simple disk space remediation:

Disk Space Cleanup

Which Events Should I Auto-Remediate?

A good way to get started quickly is to look at the alert history from your monitoring system.

  • What alerts happen frequently?
  • Of these frequent alerts, which ones are dealt quickly and/or easily?

Ask yourself those questions as you look over the monitoring events.   Most teams have a fair amount of those nagging events.  Things that happen fairly regularly and are a simple fix.  Pick one and automate it!  There is no need to automate ALL of the alerts you find right away.  These are the types of events you should auto-remediate.

Which Events Are Easy Targets for Facilitated Troubleshooting?

Take a look at your monitoring events again. Look for more general alerts that require you to touch many different systems or applications to troubleshoot. These make great candidates for facilitated troubleshooting. StackStorm can contact all these systems to gather this data, saving you (as or with the on call engineer) from having to check everything manually.

Things like application latency alerts are perfect for this. You may need to check health of networking equipment, look for long running queries or deadlocks in the database, out of memory errors, etc.

Another great example provided by our friends at Netflix was building a rich context around alerts from their monitoring system (Atlas).  They leverage the power of StackStorm to make API calls out to other tools (such as their deployment tool, Spinnaker).  Making the API queries and building the context is not something that most monitoring systems can do…at least not easily.  Make use of workflows to do this heavier work for you.

How Do I Get Others To Love Auto-Remediation?

Often, the largest barriers to getting started with auto-remediation (or automation in general) are not technical.  Team members may have had bad experiences with automations or there may even be a fear of “automating oneself out of a job”.  The best way to overcome these issues is to show people the added value of automating a process.  One of the quickest ways to do this is by giving them visibility of what is being automated.  

Make sure you are adding notifications to all your workflows! The team should see all the awesome things that you are automating. Let them see all the work that your new workflows are doing for them. StackStorm has a great notification system built in that can make this significantly easier:

StackStorm Notifications

Leverage collaborative tools like ticketing systems or ChatOps to share this information.  Make it as seamless as possible for everyone.  If most of the event management and communication is done via JIRA or Bugzilla, have the automations update the appropriate issue or ticket in those tools.  On the other hand if chat is more prevalent, post the notifications to the appropriate chat channels.  By getting early notification of events, and a rich context around that event, you’ll be able to quickly show the value of automation.

Next Steps

Now that you are auto-remediating your disk space alerts, doing facilitated troubleshooting for your application latency issues, and automating the E_NOTENOUGHCAFFEINE errors at your desk, you may ask “What’s Next?”.

Well first and foremost, if you wrote an awesome workflow we’d love to see it!  Share your operational patterns with the community.  You can either make your own GitHub repo that is publicly accessible, or submit a pull request against ours!  Let others take advantage of the remediations you have written, and maybe even help you improve them.

ST2 Contribution Repository

There are a number of different ways to proceed from here, but one of the best routes is ChatOps. For more information on ChatOps, check out our docs:

StackStorm ChatOps

And of course, there is StackStorm Enterprise. This gives you access to role based access controls, ldap authentication, and the awesome graphical workflow designer, Flow. Flow is a fantastic utility for creating your workflows as well as sharing them.

Last but certainly not least…join our community and our Automation Happy Hours!

Sign up for the StackStorm Slack Community here:

StackStorm Community Sign Up

And keep an eye out here for our next Automation Happy Hour:

Automation Happy Hour Registration

The post Auto-Remediation: Getting Started appeared first on StackStorm.

StackStorm 1.2.0: the new ChatOps

$
0
0

December 8, 2015
by Edward Medvedev

ChatOps — a concept where a chat bot acts as a control plane for your operations — has always been a core part of StackStorm. It adds context to your actions, automates routine tasks nobody likes, helps team members communicate better and learn from each other, and sometimes it’s just plain fun. If you’re new to this, check out the DevOps Next Steps talk by James Fryman, and if you’ve been writing Eggdrop scripts in IRC since you were five but never used it in your daily operations, you might also get inspired from the ChatOps at GitHub talk by Jesse Newland.

Today, we’re all excited to introduce — as a part of our 1.2.0 release — a completely revamped ChatOps feature list. If you’re already using our Hubot integration to execute StackStorm actions from chat, stop doing whatever it is you’re doing and update! If not, it’s a good time to get started: ChatOps is the way of the future, now more than ever.

This release is about control. No matter if you use StackStorm for a small personal project or a huge server farm, you want to have full control over what’s happening, and ChatOps is no exception. Now you can have a bot that’s truly yours: flexible and fully customizable, behaving exactly the way you want.

Want to have minimalistic and concise status messages? No problem.

Want to give the bot a little bit of character? You got it.

Want to name her Princess Bubblegum, eventually fall in love and heep her in your Ice Kingdom all to yourself? That’s awfully specific, but we still got you covered.

If you need a full list of changes, see our release notes and stay tuned for a more detailed post explaining all the new features; for the new ChatOps explanation-plus-tutorial, read on!


1. Under the hood

Our engineers have been working relentlessly to improve key parts of the ChatOps deployment and make it more stable, maintainable, flexible and robust:

  • Hubot-stackstorm script now utilizes st2client.js (StackStorm client library), and EventStream API for stability and ease of use.
  • We’ve placed Hubot into a Docker container, so CentOS 6/7 and RHEL6/7 are now fully supported, and deployment got faster and easier.

  • Alias parser has been completely rewritten to allow more flexibility in regard to special characters, multi-word and multi-line matching.

  • 日本語を話しますか。 ChatOps has full Unicode support now!

  • The old hubot pack is deprecated and replaced by the new chatops pack. To show ChatOps some more love, this pack is now a part of StackStorm core.

  • Various stability fixes have been introduced to fix bugs and issues reported by our amazing Slack community.


2. Acknowledgement options

Every time you issue a command, Hubot acknowledges it with a random message and your execution ID, as well as a link to StackStorm page:

Most of the time this default is sensible, and the StackStorm link is a great way to know more about your action and get additional context. However, sometimes you may find yourself in a situation where it would make sense to modify the message.

What if you just want something different? Maybe you want to strip the IDs and links so that people without StackStorm access won’t be confused, or you just want to provide your own message, or your action doesn’t take much time and an acknowledgement seems like an overkill. Luckily, ack property is now available in aliases, allowing to configure the message or disable it.

Specify a format line in your alias definition:

ack:
format: "Aye-aye, cap'n!"

If you want to disable the StackStorm URL at the end, use append_url:

ack:
format: "Aye-aye, cap'n!"
append_url: false

And if you want to insert execution ID in the format string, just use {{ execution.id }}. Simple as that!

You can also turn the message off with enabled property.

ack:
enabled: false


3. Result options

Polly is happy:

But that’s a lot of information for such a small action, isn’t it? Let’s change it to something simple! Same as with ack, you can also format result if you want to strip the metadata or adjust the template in any other way.

result:
format: "Your action is done! {{ execution.result.result }}"

Much better now. And in a rare case you’d like to disable the result output altogether, you can use the enabled property here as well.

Slack-only protip: Slack uses attachments to format the result message. While we found attachments to be the best way to handle very long messages, sometimes you want part of your message — or all of it — in plaintext. Use {~} as a delimiter to do that.

That’s what your action is done! {~} {{ execution.result.result }} will look like:

Putting the delimiter at the end (your action is done! {{ execution.result.result }}{~}) will output everything in plaintext:


4. Context and Jinja support

While {{ execution.id }} and {{ execution.result.result }} are the most common variables you’re going to need in your aliases, it’s not everything you can use by far.

Context in ack messages includes execution and actionalias, which in turn has action information in actionalias.action. Example: ack.js.

Context in result messages is wider: it includes execution status and result, as well as stdout and stderr. Example: result.js.

And here’s more good news: format strings use Jinja to render templates, so you can use filters and conditionals, too.

ack:
format: "Executing `{{ actionalias.ref }}`, your ID is {{ execution.id[:2] }}..{{ execution.id[-2:] }}"
result:
format: "{{ execution.result.result | truncate(47, True) }}"

ChatOps pack has a neat example of all the things you can do with Jinja. If you never used it before, it may look like super-wizard-class hackery, but you probably won’t need a template that complex, so don’t worry! When in doubt, look for answers in Jinja docs.

5. Extended command parser

Whoa, what’s that? Is it a bird? Is it a plane? It’s our new alias parser! While maintaining full backwards compatibility, the new parser for commands is more flexible and supports complex patterns. Here’s a few things you couldn’t do before:

Optional arguments everywhere, not just the end of the alias

ChatOps aliases support optional arguments and arbitrary parameters at the end of the string, but starting with 1.2.0 you can specify default values for every argument no matter its position.

Before:

send a letter {{ content }} {{ protocol=smtp }} {{ addressee=moc.elpmaxenull@tobuh }}

Now:

{{ protocol="smtp" }} send {{ addressee="moc.elpmaxenull@tobuh" }} a letter: {{ content }}

Multi-word and multi-line matching

If you wanted to pass multiple words as a ChatOps command argument, you had to enclose the match in quotes and use no more than one line. Starting today, lose the quotes and pass long and even multi-line arguments as much as you want. Finally you can make your bot read wonderful poetry!

read out loud: {{ chapter }}

Before:

read out loud: justonewordummmm
read out loud: "multiple words with quotes, but just one line"

Now:

Fun with regular expressions

Now for the most powerful feature: the new parser is regex-based, and you’re free to unleash the dark powers of regular expressions onto your aliases. This might be a good time to add some character to your bot!

Before:

get my {{ thing }}

Now:

(get|accio|fetch|beam)( (a|my|the))? {{ thing }}(,? (right now|immediately|up))?[!.]?

This alias will match accio slippers as well as fetch the tennis ball, right now!:


6. Help representations

Now, let’s assume that you actually came up with something like (get|accio|fetch|beam)( (a|my|the))? {{ thing }}(,? (right now|immediately|up))?[!.]? in your production deployment. Here’s what Hubot help would look like:

What will happen when people see it? Will your boss give you a raise for being such a smart guy? Will your coworkers go insane trying to comprehend all this? Will you burn at the stake for doing some dark computer magic? We’ll never know, because now you can explicitly specify a help entry for every format string!

formats:
- display: "get {{ thing }}"
representation:
- "(get|accio|fetch|beam)( (a|my|the))? {{ thing }}(,? (right now|immediately|up))?[!.]?"

You can even mix “display + representation” objects with ordinary format strings:

formats:
- display: "get {{ thing }}"
representation:
- "(get|accio|fetch|beam)( (a|my|the))? {{ thing }}(,? (right now|immediately|up))?[!.]?"
- "get {{ thing }} from {{ location }}"
- "get {{ thing }} from {{ location }} at {{ time }}"

Now the masterfully crafted regex is still working, but stays hidden from public view:


All good things come to an end, and so does this feature list. Hope you liked it! Go crazy with all that new ChatOps goodness, and don’t forget to tell us about your awesome bots and integration scenarios in our Slack community or by e-mail. Love. ❤️

— Ed

The post StackStorm 1.2.0: the new ChatOps appeared first on StackStorm.

StackStorm 1.2 release announcement

$
0
0

December 8, 2015
by Manas Kelshikar

The holidays are upon us and we decided to celebrate with our v1.2.0 release of StackStorm! StackStorm v1.2.0 follows up as an update to our blockbuster v1.1.0.

StackStorm 1.2 features significant changes to ChatOps, some smaller improvements and plenty of bug fixes. Lets walk through some of the highlights –

ChatOps

The ChatOps changes are so extensive that we decided to dedicate a separate blog here. Once users familiarized themselves with StackStorm-powered ChatOps we received excellent feedback which has been translated into some of the improvements in this release.

The major theme is extending further your control of your ChatOps and especially what is presented in your precious chat real-estate.  We commercially support ChatOps – and we think improve it greatly versus rolling your own flavor of a bot or directly connecting more and more integrations to chat.

While we were at it we also took the liberty of reworking some StackStorm internals to better suit ChatOps needs thus enabling some of the features and opening up the door for many more future improvements.

Feature highlights – more than ChatOps

Bastion host support (By Logan Attwood)

StackStorm remote runners now support bastion hosts. If your infrastructure requires bastion hosts to access various parts of the infra then we have you covered. Simply specify the bastion host property to proxy commands over to a remote host.

We love it when community members contribute key features and help to grow StackStorm. Your contributions are welcome and much appreciated.  Thank you Logan!

Pack testing

You must already know about StackStorm Packs. Take a look at our community repos st2contrib and st2incubator for a wide range of existing packs.

With v1.2.0 we worked to improve the ability to test packs so that packs can get the same rigorous unit testing and integration testing as you would for your applications. These improvements make it easier to manage packs with a CI/CD pipeline so that you can make sure that only quality packs show up in a production StackStorm installation – this is DevOps getting a little meta.  Infrastructure as code!

Check out the pack testing docs to learn more.

Templating support in notifications

Notifications used to only be static strings.  As we strive to provide users more control, we decided to make it so that notifications can now be templatized. This means the notification messages can be more meaningful and fit better into your approach.

Notifications are a convenient way for StackStorm to either email, text, or respond in chat on the completion of an execution – or maybe you can invent another way to use them. More info about notifications can be found here.

Timeout and retry policies

Timeouts are a fact of our modern day Ops life. So we decided to provide these some special meaning and also this allowed us to enable some interesting policies. You can now setup a policy to retry N times on a timeout since often timeout failures resolve on a retry.  Docs for retry policy can be found here.

Improved ActionChain error reporting and validation

StackStorm 1.2 also adds more validation and better error reporting for the simple ActionChain workflow engine. Here we are trying to better report any statically identifiable errors and also to provide visibility into failures.

core.noop action

This is a no-op action that can be used as a placeholder action while testing workflows and rules and so forth. Also, this core.noop action is tremendously useful when combined with notifications and other value adds on top of an execution.

Serving api and auth off single HTTPS port

Previously, StackStorm deployments required separate ports to serve AUTH and API endpoints (9100 and 9101). We changed this to enable StackStorm to serve all the REST API endpoints off a single HTTPS, and made them “default” when you deploy StackStorm with All-in-one installer.

But wait, there is more!  To see the full list features and bug fixes new in v1.2.0 head over to the release notes.

As always if you got question or would just like to say hi please head over to https://stackstorm.com/community/ on how to find us.

The post StackStorm 1.2 release announcement appeared first on StackStorm.

Chatops Pitfalls and Tips

$
0
0

December 11, 2015
by Dmitri Zimine

You are starting with ChatOps.

You have already watched Jesse Newland, Mark Imbriaco and our own James Fryman and Evan Powell preaching it. You’ve read the links on reddit, and skimmed ChatOps blogs from PagerDuty and VictorOps. You’ve studied ChatOps for Dummies

Congratulation and welcome to the journey, ChatOps is awesome way to run development and operations. I’ll spare repeating why ChatOps is good – you’ve eager to get going. I’d rather focus on few common pitfalls and misconceptions that can get you off the track.

chatops-pile

TL;DR

This is a loooooong blog posts… so here are topics, jump right in if you’d like:

Coffee? JS? Ruby? Python? A Fallacy of False Choice.

One of the first things you learn about ChatOps is “Bots”. There are bots, quite a few of them. Hubot Lita, and Err are the often cited as the most popular, but there are many more. They are important, and you (tend to believe) need to think carefully about selecting your bot, because this choice defines the programming language you’ll use for ChatOps and other aspects of your implementation.

“Your preference on programming languages may determine which bot you ultimately choose.”
Jason Hand, ChatOps for Dummies

There is a problem, though: this line of thinking leads to a naive implementation of ChatOps which I have seen far too often. Teams often select a bot based on a preferred language to write ChatOps commands. They then go ando implement these actions as Bot plugins. To add another command – add another CoffeeScripts (or JS, or Ruby, or Python, etc)… Warning: This is the Wrong Way.

wrong_way

Let me detail it on a concrete example: provision a VM on cloud. When ChatOps-ed, it would look something like this:

      > user: ! help create vm 
      < bot: create vm {hostname} on { provider: aws | rackspace } 
      > user: ! create vm web001 on aws
      < bot: on it, your execution id 5636fac02aa8856cc3f102ec 
      ... < some chatter here > ...
      < bot: hey @user your vm is ready: 
             web001 (i-f99b4320) https://us-west-2...

What is under the hood? The VM creation is likely 4-7 steps calling low-level scripts (create VM, wait for ssh to come up, add to DNS, etc). Times N, where N is a number of providers and the steps may differ slightly. Just for one command. Do you want to place this stuff all under the Bot? And make the bot your “automation server”, your control plane? Which leads you to deal with security, availability, logging and other aspects that Lita, Hubot, Err, don’t bring out of box. Or do you consider putting these scripts somewhere else and write a coffee-script to make it ChatOpsy with the help and human-talk-like syntax? Which leads to two smoking piles of scripts, a maintenance nightmare to keep all that smoke in sync?

Don’t fall into the fallacy of false choice here. The right choice is: “base Chatops on the Automation Library, expose actions to scripts with no extra code”.

The Automation Library is a core Operational Pattern that states that the operations against the infrastructure comprise an automation library that can be written in any language and versioned, reviewed, and available to ops and developers with fine-grain access control on who can run what and where. This automation library becomes your control plane. As such, it must be secure, reliable and highly available not only from ChatOps but from API, CLI, and hopefully GUI.

If you do use an Automation Library, you can then expose actions easily to chatops. A good solution will provide chat friendly syntax, help, and other goodies with no need for extra code on the Bot side. Bots are a part of the ChatOps solution, but they are like wheels, not the whole car, thus their choice is an internal implementation detail.

We have learned that those who are doing ChatOps right, do it this way. Take GitHub: they have a library of automation scripts, some of which are exposed to Hubot, with no extra Coffee on Hubot side (this part of their Chatops solution is not open sourced yet). Or take the devops folks from Oscar Insurance who presented their impressive ChatOps solution on Atlassian Summit. Or take WebEx Spark (StackStorm user!) – they have spoken about how they use Spark for ChatOps with StackStorm underneath as automation library and more.

Tip: Build your automation library first. Than expose some actions to Chatops. Stay in control what actions you expose and what you keep.

Bot or Not

What about the other extreme? For example, take the off-the-shelf integrations from services like Slack or HipChat… are you now doing ChatOps? Are 88 plugins by Slack not enough to do what I want? What about 112 HipChat integrations?

No, it won’t be enough.

Yes, there are great integrations and it is practical to leverage them here and there. Our team is on Slack, where we happily use Travis-CI, re:amaze, a bunch of configured email integrations. We absolutely love to /hangout when we need to talk.

But when it comes to a full ChatOps solution, you’ll quickly find that the exact integration you need are either: 1) not there 2) not doing what you need or 3) not doing it the way I want it.

  • Not there: NewRelic and Nagios happen to be in Slack, but Sensu, Logstash and Splunk integrations are not.
  • Not doing what you need: It’s fine that Slack’s Jira integration posts issues and updates. But what I really want is to create JIRA issue from my chat. It is not possible today. Even a revamped HipChat Jira integration” is not doing it – you may think they would, coming from the same company?

And what can YOU do about it? Complain? File a feature request? Hack up a slash command one-off? I move that you stay in control of your integrations, on what tools are being integrated, and how exactly they are integrated. Some of the integrations, incidentally, will be custom scripts against proprietary endpoints. Supporting it natively is a stretch for Slack, HipChat, or any chat service. A bot gives you that level of control, and integrates smoothly with the Chat services.

“Some could argue that a chatbot isn’t absolutely essential to begin your journey into ChatOps. All chat clients >outlined in Chapter 2 offer a wide range of third‐party integrations that can allow users to begin querying >information and interacting with services without the help of a bot. It wasn’t until teams began building more >complicated scripts that chatbots became an important piece of ChatOps. Nowadays, to take full advantage of >ChatOps, you really need a chatbot to execute commands that are specific to your own organization’s infrastructure >and environment.”

Jason Hand, “ChatOps for Dummies”

Tip: Don’t limit yourself to what’s out of box in your Chat platform. Own your ChatOps commands. Use a bot to expose your automation library to a chat platform.

Slack’s stash commands and incoming webhooks give a solid foundation for a custom Chatops solution, to the extent you are fine with exposing a [part of] your control plane over public REST endpoint. It by far beats a “naive approach”. And doesn’t require a bot. So, should you lock in with Slack? That brings me to my next point.

Best Chat for Chatops, or Is Slack eating everything?

While on the topics of Chat platforms and services: how do you choose one? Which one should you choose and why? Should you look for a more “ChatOps friendly” chat if you’re already using an established service? What about when you hear the claim that “the XXX Chat is a true ChatOps platform”, do you believe it?

The truth is ChatOps works with ANY chat platform, with any chat client. So the choice of a chat platform is entirely your team’s choice.

While Slack is a favorite of today with an incredible 1.7M users, history teaches us that favorites change. It was HipChat and Flowdock two years ago, Campfire 4 years, and IRC remains steady at ~300,000 users, a timeless favorite for many hardcore ops. New chat platforms grow like mushrooms after the rain, including opensource “Slack alternatives”: Mattermost kandan Zulip -these are only a few that have come up on my radar recently.

Think of a chat. Pick any. Got one? Good, now, here’s a secret: there are a few teams that WILL NOT BE USING IT, for reasons beyond our reasonings or control. “Must be on prem” policy. A lead Architect hates non-OSS software. A team is writing their own chat. Someone took this [anti-slack debate](Debates https://news.ycombinator.com/item?id=10486541) too close to one’s heart. Any of 1,000 other reasons.

There will always be different chats out there to choose from. It’s a choice that your team should make, or likely have already made, based on the merits of the Chat itself. Chatops can live on any platform, and when it’s frictionless, and makes people’s job easier, they won’t care if it’s graphical, text, or what-so-ever. The right ChatOps solution will support the chat of your choice. It will take advantage of a given chat platform, like leverage HipChat or Slack syntax formatting, while gracefully degrading to text for IRC. That’s where bots come in place: they provide an interface for a variety of chat platforms, giving a layer of abstraction and customization. That, not a programming language for commands, is the basis to pick a bot for your DIY chatops. That is how we leverage bots in StackStorm.

Tip: Stay in control of what chat platform to use. It’s the choice of your team. Turn away from solutions forcing their own chat on you. Use a bot, to make your ChatOps solution support a chat client you team loves today or will love tomorrow.

It’s a duplex, dummy

How do you like a team member who only responds to requests, never says a thing or cracks a joke? Same applies to your ChatOps Bot. Just firing up the commands from the chat is not good enough; it goes in both directions: when something happens with your infrastructure, the bot should notify the chat room. With the proper two-way integrations your ChatOps will rock like GitHub’s. Here is a fictional example based on watching GitHub Ops team in their devops lair in Nashville (glimpse here):

      > bot: twitter says "we are down"
      < user: @bot shut up twitter
      > bot: twitter silenced for 15 min, get busy fixing stuff fast!
      > bot: Nagios alert on web301: CRITICAL, high CPU over 95%
      < user: @bot nagios ack web301 
      < user: @bot graph me io,net on web301
      > bot: @user Here's your graph: https://mygraph.example.net/web301?show=io,net
      > other_user: looks like it's just high load. Let's add couple of nodes!
      < user: @bot autoscale add 2 nodes to cluster-3
      > bot: @user On it, your execution is 5636fac02aa8856cc3f102ec 
             check the progress at https://st2.example.net/history/5636fac02aa8856cc3f102ec

In this short dialog, a bot acts as a two-way relay between the infra and the chat. It reports events and responses to user’s commands. Under the hood, a solution wires in various sources of events, like Nagios, NewRelic, or Twitter (true, GitHub users Twitter as a monitoring tool), and relays them to chat by some rules. A shut up twitter may disable a rule for a period of time; a nagios ack may call Nagios to silence an alert. Other commands call actions which do as little as forming and posting a URL, or as much as launching a full-blown mutli-step auto-scaling workflow.

      StackStorm chatops two-way implementionation:

             Infra ---> st2 Sensors ---> st2 Rules ----------> Chat
             Infra <--- st2 Actions <--- st2 API   <-- Bot <-- Chat

Again, don’t trap yourself in believing that out-of-box integrations from Slack, HipChat, or “the Next Big Chat”, will be enough. Not just vendor lock-in, not just lack of code to control/update/edit settings. Think about your behind-firewall logstash and graphite, or posting collectd charts when Sensu events fire. Think Your toolbox will always be ahead of the mainstream. Design for that, and stay in control of your integrations with your infra and tools.

There is another trap when it comes to incoming integrations: it’s too easy to have it spread out all over your tool set. It’s tempting to post alarm straight from Sensu handler to Slack. To use the stock “Splunk – New Relic” integration. To add “post to HipChat” block to the end of your provisioning script. At the beginning it looks fine. Warning: Wrong Way.

wrong_way

This approach gets messy very fast. As fast as n*(n-1), where n is how many tools used by your team. And NO, it’s not n*(n-1)/2, as integrations are two way. For each integrated, you need both incoming and outgoing integration. Triggers and actions. Sensu sends alert (incoming, trigger) and Sensu silence alert (outgoing, action). Jira update ticket (action) and Jira on ticket update (trigger). Once you beyond two or three tools, it quickly spirals into unmanageable, unmaintainable spaghetti. Where is all my automation? How do I turn it off?

Just like a consolidated, shared library of actions, you need a shared, consolidated library of “rules”, defining what gets posted to chat on which events and how. And just like a library of actions, these rules better be readable, scriptable code under version control, with API, CLI and other goodies. If this reads like a shameless plug for StackStorm, it is because our team believes in this so much that we made it we’ve made it the center of our design.

Tip: Design ChatOps for two-way communications. Build a consolidated control plane for the event handlers to provide visibility and control of what events are posted to the chat.

Towards a smarter bot

This came up off the recent conversation with folks implementing Chatops with StackStorm. We begin to brainstorm how to make Bot act more like a human. One idea that came up is “carrying the context of a conversation”. That means that bot asks a question and I can just answer “@bot yes”, and just like a human, the bot will be smart enough to know what I am saying “yes” to. Or may be careful enough to ask clarification questions:

     > bot: @dzimine you mean "yes" to "should I restart web301 ? If so, say "pink marinny"
     > dzimine: @bot pink martini
     > bot: ok @dzimine, on it, your execution is 5636fac02aa8856cc3f102ec
...

Another example of a smarter bot is providing two-factor command authorization, when two people should +1 an action. This comes handy on when launching some mission-critical automations. Surely it requires some workflow capabilities on the script side, but it can be done.

More brainstorming on smarter bot is happening on our chat, at stackstorm-community.slack.com. Please join and bring up your thoughts and ideas.

Chatops, StackStorm way

Time for a good StackStorm plug: we deliver an Automation Library, with turn-key ChatOps solution out of the box. We have taken these lessons, and more, and turned them into code. With StackStorm’s ChatOps, you choose your chat, implement actions in the language of your choice, and use community integrations with dozens of devops and infra tools. StackStorm guides you to the “right way”: start with automation library, then turn any action to chatops commands just by giving it an alias; 2) consolidate event routing with sensors, than route any event to ChatOps just by adding a rule.

We think of ChatOps as not a sidekick, but an integral part of your control plane. Invest upfront, profit over time. With StackStorm, you progress from simple commands like “create Jira ticket” or “deploy VM” to more powerful ones, by combining them into workflows of many actions underneath and turning these workflow actions into chatops commands. For how it works, check out a journey towards Chatops from Cybera.

This week we released StackStorm 1.2; Chatops is a highlight of the release, with so many new things and improvements that that the blog describing them is called “The New Chatops”. Please check it out, give StackStorm’s Chatops solution a try, send us feedback, and Happy ChatOpsing!

The post Chatops Pitfalls and Tips appeared first on StackStorm.

Automation Happy Hour #09 – Multi-Cloud Orchestration

$
0
0

For the next Automation Happy Hour, Patrick Hoolboom is joined by Anthony Shaw of Dimension Data to discuss best practices for multi-cloud orchestration using StackStorm.

Anthony is a Product Development Manager, Innovation and Research for Dimension Data in Sydney, Australia. Within ITAAS global R&D team, he is responsible for driving technical innovation, automation and integration strategies for Dimension Data cloud and other.

CLICK HERE TO REGISTER


The post Automation Happy Hour #09 – Multi-Cloud Orchestration appeared first on StackStorm.

Automation Happy Hour #08 – How Netflix Uses ST2 for Auto Remediation of Cassandra

$
0
0

Patrick Hoolboom discusses project details with Sayli Karmarkar and Jean-Sebastien Jeannotte, Senior Software Engineers from Netflix and asks them in-depth questions.


Sayli Karmarkar is a software engineer with 7 years of experience in developing platforms and services to configure and manage thousands of systems in an enterprise. She is passionate about designing systems with focus on scalability and performance. Sayli worked at Red Hat on their systems management platform (Satellite) used to efficiently deploy, configure and monitor RHEL infrastructure.

Jean-Sébastien is a seasoned Linux (System|Software) engineer with 13 years of experience automating management of physical, virtual and cloud based systems, as well as designing and developing software solutions and tools. Self-starter with deep knowledge of Amazon Web Services and Python/Bash shell scripting, he is very passionate about solving production issues through automated remediation. Since 2013, he is working as a Senior Software Engineer for Netflix.

The post Automation Happy Hour #08 – How Netflix Uses ST2 for Auto Remediation of Cassandra appeared first on StackStorm.

There Are No Upcoming Events Scheduled at This Time


Stackstorm: from Nagios integration to Openstack automation

$
0
0

January 07, 2016
by Igor Cherkaev aka eMptywee

Recently I’ve been playing around Stackstorm – a platform for integration and automation of day-to-day tasks, monitoring events, existing scripts and deployment tools.

I am going to explain how easy it is to wrap your daily tasks into Stackstorm actions and workflows and how to provide a simple way of execution for complex tasks.

I’ve been thinking for a while and initially I was going to bring everything up in one blog post. But later, it didn’t seem like a good idea. That being said, I’d rather break it into multiple posts, no matter how many there would be. Anyway, it seems to me that it’d be more practical and easier to read and understand.

Nagios

Let’s start with integrating Nagios alerts into Stackstorm. Assuming that you already have Stackstorm version 1.2.0+ installed, configured and running, as well as there’s Nagios running somewhere else that is capable of processing alerts and handling events. If not, please, proceed to www.stackstorm.com and www.nagios.org (installation and initial configuration of these two tools is beyond the scope of this post). Both tools are open source and free to use and have extensive documentation on installation and basic configuration.

First of all, I was happy to find an existing Nagios integration pack on StackStorm community repo, but my joy ended really quickly as I found it not working. Secondly, this StackStorm tutorial helped me to get started.

Although it talks about sensu and victorops (monitoring and paging tools), you can easily apply the logic to Nagios. With the help from Stackstorm support team (they are really cool guys and they reside on Slack, see https://stackstorm.com/community for details) I was able to patch the st2 service handler python script to make it work (see diff here https://www.diffchecker.com/vzsiskbg). Don’t worry, later I’ll post a link to the github repository with all the files you need.

Also, don’t forget to apply for a trial Enterprise Stackstorm edition! You will get a very cool Flow Visual Editor that will let you create really nice workflows with a drag of your mouse! I highly recommend to at least try it. It won’t hurt, I promise.

Deploying the pack

Let’s go ahead and deploy our example nagios pack (the repository itself is located at https://github.com/emptywee/e_nagios):

st2 run packs.install packs=e_nagios register=all repo_url=https://github.com/emptywee/e_nagios.git

Don’t worry if you see that re-loading rules throw some exceptions due to non-existing triggers. It’s all right at this point of time. The trigger will be created once you run the st2 service handler script from the nagios server (assuming that it can easily connect to your stackstorm server over ports 9100 and 9101 and the username-password pair is correct, and the latest stackstorm version supports accessing auth and API endpoints on 443 port as well, but I haven’t tried this approach yet). But this shouldn’t happen since we have all rules disabled by default in the pack. Let’s go ahead and enable nagios_service_chat.yaml rule. Simply edit it with your favorite editor in /opt/stackstorm/packs/e_nagios/rules/ and switch enabled to true.

Adjusting rules

Let’s take a brief look at the rule itself (nagios_service_chat.yaml):

---
name: notify_chat
pack: e_nagios
description: Post to chat when nagios service state changes
enabled: true
trigger:
 type: e_nagios.service_state_change
criteria:
 trigger.attempt:
   pattern: 2
   type: gt
action:
 ref: chatops.post_message
 parameters:
   message: NAGIOS {{trigger.service}} ID:{{trigger.event_id}} STATE:{{trigger.state}}[{{ trigger.state_id }}]/{{trigger.state_type}}
     {{trigger.msg}}
   channel: '563b5f7f21f7a36d7bd5baaf'

trigger: – is the trigger name that will make this rule fire up the action when certain criteria are met. In our case here we will post a message to our chatops (be it Slack, Lets-chat, HipChat or any other that is supported by Hubot). Plugging in chatops has become a simple task since v1.2.0 of Stackstorm has been released. So make sure you have chatops up and running to fully utilize all features, comfort, flexibility, and other bells and whistles of Stackstorm platform.

criteria: – with only AND logic so far you can specify when exactly you’d like the action to be executed. In this example we want the bot to report to chatops whenever any service or host changes its state into HARD state (usually after 3 consecutive checks with the same result).

action: – what should be executed when the criteria are met. In our case here we will just post a message to the specific channel. If you are using Slack, the channel should be more readable and meaningful name. Don’t hesitate to alter it to your needs.

Don’t forget to reload the rules:

st2ctl reload --register-rules

There’s another way to temporary enable rules:

st2 rule enable e_nagios.notify_chat

But it will get disabled back after the next reload of the rules unless you modify respective YAML file with the rule definition (so-called meta-data).

Setting up Nagios

If you take a look at the st2 service handler script, you may notice that it is you who decides what to pass from Nagios to Stackstorm rules. Because it’s up to you to put anything you want into the payload that the script will send to Stackstorm. All these trigger.service, trigger.msg and alike are just parts of a payload that is formed on the Nagios host. With tens and hundreds of macros available in Nagios you may choose those that fit your needs. Here’s a link to the standard Nagios macros:
https://assets.nagios.com/downloads/nagioscore/docs/nagioscore/3/en/macrolist.html

Here’s what you should do on the Nagios host. First of all, you need to upload st2service_handler.py script and st2service_handler.conf to the Nagios host and place them somewhere you like, make sure that Nagios can execute the script from that location. Make the script executable. Secondly, you need to define a check command with macros you found in the link just above. In my case I uploaded the script into the /opt/nagios/libexec/ directory and have Nagios with NRPE setup, so I define it in the master nrpe.cfg file:

command[st2nagios]=/opt/nagios/libexec/st2service_handler.py /opt/nagios/libexec/st2service_handler.conf $SERVICEEVENTID$ "$SERVICEDESC$" $SERVICESTATE$ $SERVICESTATEID$ $SERVICESTATETYPE$ $SERVICEATTEMPT$ $HOSTNAME$

Then apply this command to global_service_event_handler in nagios.cfg:

global_service_event_handler=st2nagios

That is it! We are almost done with the Nagios part. A good thing would be running the command manually as the nagios user:

$ whoami
nagios
$ /opt/nagios/libexec/st2service_handler.py /opt/nagios/libexec/st2service_handler.conf 123456 "Disk /var/log" WARNING 1 HARD 3 remote_host_name
Registered trigger type with st2.
POST: url: https://st2.example.com:9101/webhooks/st2/, body: {'trigger': 'e_nagios.service_state_change', 'payload': {'attempt': '3', 'service': 'Disk /var/log', 'event_id': '123456', 'state': 'WARNING', 'state_type': 'HARD', 'host': 'remote_host_name', 'msg': '[WARNING] Service/Host warning alert!', 'state_id': '1'}}
Sent nagios event to st2. HTTP_CODE: 202

This will register a trigger. After that you can safely reload rules that rely on the e_nagios.service_state_change trigger. Also, running it manually will let you test your rules and actions without actually forcing Nagios to generate real alerts. That is a good thing, isn’t it?

So, in short, we are basically filling in our own payload and passing it from Nagios to Stackstorm. Just make sure that st2service_handler.py script has all the fields defined and in the correct order if you are about to add or remove Nagios macros from the event command.

The relevant part about it in st2service_handler.py is:

def _get_payload(host, service, event_id, state, state_id, state_type, attempt):
   payload = {}
   payload['host'] = host
   payload['service'] = service
   payload['event_id'] = event_id
   payload['state'] = state
   payload['state_id'] = state_id
   payload['state_type'] = state_type
   payload['attempt'] = attempt
   payload['msg'] = STATE_MESSAGE.get(state, 'Undefined state.')
   return payload
def main(args):
   event_id = args[1]
   service = args[2]
   state = args[3]
   state_id = args[4]
   state_type = args[5]
   attempt = args[6]
   host = args[7]
   body = {}
   body['trigger'] = ST2_TRIGGERTYPE_REF
   body['payload'] = _get_payload(host, service, event_id, state, state_id, state_type, attempt)
   _post_event_to_st2(_get_st2_webhooks_url(), body)

The order is defined by the array index of args passed to the main function. This is very important.

Verifying in chatops

Best way to verify it’s working is run the command manually from the Nagios host. You should see your bot reporting to the channel as it’s set in the rule.

bot reports Nagios alerts

Simple, eh? Now with what we have achieved so far, we can move forward and enhance our alert handling service.

Enhancing alert handling

Although it’s very exciting to receive alerts in the chat room, it doesn’t make you much happier than you already are, and it certainly doesn’t relieve you from manually going and checking what exactly triggered the alert and take remedial actions.

Your use-case and real world scenarios might be slightly different, but a disk space auto-remediation is a common task that everyone runs into during their day-to-day operations. You don’t really want to be awaken by a call early in the morning just to log in remotely and clean up some log files that filled up the whole disk. So it makes a really good example to deal with.

That’s where the nagios_service_disk.yaml rule comes handy. Let’s take a look at it:

---
name: check_disk
pack: e_nagios
description: Check disk usage and trigger remediation
enabled: true
trigger:
 type: e_nagios.service_state_change
criteria:
 trigger.service:
   pattern: "^Disk"
   type: matchregex
 trigger.state_type:
   pattern: "HARD"
   type: matchregex
 trigger.state_id:
   pattern: "0"
   type: gt
action:
 ref: e_nagios.remediate_disk_workflow
 parameters:
   hostname: "{{ trigger.host }}"
   directory: "{{ trigger.service | regex_replace('^Disk\\s*', '') }}" 

Pretty similar to the one above that just posts messages to the chat room, right? Don’t forget to enable it, as it comes disabled by default. Although we utilize the same trigger, criteria here are slightly different. We are matching service description to a certain regex pattern, and we explicitly matching hard state of the alert, and catching state ID greater than zero (since in Nagios 0 means RECOVERY, 1 – WARNING, 2 – CRITICAL). We do not want to automatically fire an action on recovery alerts, right? At least in this case. One thing is also important here, and I once spent a lot of time figuring out why my rule didn’t work properly. The thing is that you really should wrap your patterns in double-quotes when you define your criteria. Even if it’s an integer (see trigger.state_id criterion as an example).

That being said, once we receive an alert with the matching criteria Stackstorm will execute the defined action and do some magic with the parameters we are passing to that action. Namely, the action is called e_nagios.remediate_disk_workflow and is defined under actions/ directory of the pack. We also pass hostname that triggered the alert and stripping Disk part out of the service description, leaving only the directory of the mounted partition itself (assuming that disk monitoring service has appropriate service description defined in the Nagios config, don’t hesitate to adjust to your own environment here). Yes, Stackstorm supports Jinja2 filters in the rules definition when you pass parameters to actions!

Disk Space Remediation Action

It’s time to design our auto-remediation action! Here’s how it looks (and it does really look nice) in the Visual Flow tool that comes in the Enterprise Stackstorm edition:

Visual Flow workflow design

The workflow itself is pretty simple and consists of the following steps:

  1. Report in the chatops that we received the task to check the disk space;
  2. Run the disk check action that confirms the alert from Nagios;
  3. If the disk usage is above the defined threshold, run an auto-remediation action, else report in the chat room that it was a false positive alert from Nagios;
  4. If the auto-remediation action completes with no errors try to check the disk space usage again, else report about the error in the chat room;
  5. If the disk space usage comes below the defined threshold assume that auto-remediation succeeded and report about it in the chatops, else report in the chat room that the auto-remediation failed.

Suffice to say that reporting to the channel can be substituted or extended to reporting via email or any other means to page you and ask for manual intervention. The good thing here is that the scripts that do all the job can be written in any language you like, just make sure they can be executed remotely on the host that is being checked.

Before we can design our workflows in the Visual Flow, we need to define two basic actions for our needs:

  1. check_dir_size
  2. disk_remediate

The meta-data for the check_dir_size action is defined in YAML and looks like this:

description: 'Check the total percentage of disk taken up by a specified directory'
enabled: true
entry_point: check_dir_size.py
name: check_dir_size
parameters:
 action:
   description: "Run as an action.  (Outputs structured data)"
   default: true
   immutable: true
   type: boolean
 directory:
   description: "The directory to check"
   required: true
   type: string
 threshold:
   description: "Maximum percentage of disk space that can be consumed by the directory."
   default: 80
   type: integer
 debug:
   description: "Turn on debug output"
   default: false
   type: boolean
 sudo:
   default: true
   immutable: true
runner_type: remote-shell-script

Three things to pay attention to: entry_point, parameters and runner_type. Since it’s a remote-shell-script runner, there’s an implied parameter hosts that this action will require (see https://docs.stackstorm.com/runners.html for details, for instance in case you need to provide password authentication). entry_point points to the script name that should reside in the same directory. parameters declares all parameters that will be passed to the script, their types and other options. As a homework you may want to transform the alert level (Warning or Critical) coming from Nagios into threshold level for the script. But it should be done in the workflow that is depicted earlier when we talked about the Visual Flow instrument.
And the most interesting action is the disk_remediate action. Let’s take a look at the meta-data of the action:

description: 'Try to remediate disk space issues'
enabled: true
entry_point: disk_remediate.pl
name: disk_remediate
parameters:
 action:
   description: "Run as an action.  (Outputs structured data)"
   default: true
   immutable: true
   type: boolean
 directory:
   description: "The directory to check"
   required: true
   type: string
 debug:
   description: "Turn on debug output"
   default: false
   type: boolean
 sudo:
   default: true
   immutable: true
runner_type: remote-shell-script

Basically it looks very similar to the first one. And here’s where your imagination comes forward. The dummy auto-remediation script may look something like this:

#!/usr/bin/perl
use strict;
use Getopt::Long;
#use JSON;

my $directory;
my $debug;
my %output;

GetOptions(
   "directory=s" => \$directory,
   "debug"      => \$debug
);

if ( !defined( $directory ) )
{
   $output{ 'result' } = 'fail';
   $output{ 'reason' } = "Directory is not provided!";
   finish( 1 );
}

if($directory eq '/var/log')
{
# do something with /var/log
}
elsif ($directory eq '/var')
{
# do something with /var
}
elsif ($directory eq '/home')
{
# do something with /home
}
elsif ($directory eq '/opt')
{
# do something with /opt
}

$output{'result'} = 'success';
finish(0);

sub finish
{
   my $exit_code = shift || 0;
   #my $json = encode_json \%output;
   #print "$json\n";
   exit( $exit_code );
}

Who writes in Perl nowadays you’d ask? I don’t know. Some old farts like me, probably. But you may go ahead and use your favorite Bash, Python or Ruby. All that matters is that it should be executable remotely on the host, where the disk issue is appeared and reported by Nagios. You may want to compress logs, upload them, move them, just delete them, enable compression in logrotate configuration or even try to extend logical volumes if you have some spare space left when such need arises. It’s completely up to you what to do. I have disabled JSON output in the dummy script since JSON module is not installed by default on the Linux distributions. In general it’s a good idea to produce outcome in JSON format, since it then can be easily adopted and published by actions in a workflow.

And in the end the whole workflow after you put everything together will look like (which is also shown on the picture in the beginning of the chapter, but in Visual Flow representation):

---
version: '2.0'

e_nagios.remediate_disk_workflow:
 type: direct
 input:
   - hostname
   - directory
   - threshold
   - channel
 tasks:
   lets_work:
     # [466, 27]
     action: chatops.post_message
     input:
       channel: <% $.channel %>
       message: "epsibot is trying to take care of the disk space issue on <% $.hostname %> in <% $.directory %>"
     on-success:
       - check_dir_size
   check_dir_size:
     # [289, 149]
     action: e_nagios.check_dir_size
     input:
       hosts: <% $.hostname %>
       directory: <% $.directory %>
       threshold: <% $.threshold %>
     on-success:
       - hubot_error
     on-error:
       - remediate
   hubot_report:
     # [485, 568]
     action: chatops.post_message
     input:
       channel: <% $.channel %>
       message: "epsibot has cleared <% $.directory %> on <% $.hostname %> and it is now less than <% $.threshold %> percent!"
   hubot_error:
     # [114, 274]
     action: chatops.post_message
     input:
       channel: <% $.channel %>
       message: "Alert from Nagios was false positive for <% $.directory %> on <% $.hostname %>!"
   remediate:
     # [489, 233]
     action: e_nagios.disk_remediate
     input:
       hosts: <% $.hostname %>
       directory: <% $.directory %>
     on-success:
       - check_dir_size2
     on-error:
       - hubot_rem_fail
   check_dir_size2:
     # [485, 410]
     action: e_nagios.check_dir_size
     input:
       hosts: <% $.hostname %>
       directory: <% $.directory %>
       threshold: <% $.threshold %>
     on-success:
       - hubot_report
     on-error:
       - hubot_rem_fail
   hubot_rem_fail:
     # [82, 464]
     action: chatops.post_message
     input:
       channel: <% $.channel %>
       message: "Auto-remediation failed for <% $.directory %> on <% $.hostname %>. Please check manually."

As I mentioned earlier we can actually pass how critical the alert was (was it just a warning or the situation is critical) and act accordingly by altering the threshold or telling our script to be more aggressive.

At last, let’s look at the workflow’s metadata, as it contains parameters that tie it to the rule we started from:

---
 name: "remediate_disk_workflow"
 runner_type: mistral-v2
 description: "Remediation workflow for diskspace alerts"
 enabled: true
 entry_point: "workflows/remediate_disk_workflow.yaml"
 parameters:
   hostname:
     type: "string"
     description: "Host to remediate disk space on"
   directory:
     type: "string"
     description: "Directory to prune if over the threshold"
   threshold:
     type: "integer"
     description: "threshold for check diskspace action. percentage"
     default: 75
   channel:
     type: "string"
     default: "563b5f7f21f7a36d7bd5baaf"
     description: "Channel to post messages to"
   context:
     default: {}
     immutable: true
     type: object
   task:
     default: null
     immutable: true
     type: string

For example, we can define an array in the metadata with threshold levels for critical and warning alerts and use it to pass different numbers to disk check scripts later in the workflow. Think about it on your own and try to implement.

Hope that helps to get your started with auto-remediation and guard your sleep at night. There are a few other rules in the pack worth looking at, e.g. triggering actions on “proc” and “load” Nagios service alerts. That being said, you may want to restart processes when Nagios reports them down.

We will talk about Stackstorm and Openstack integration in the next series of my posts.


This guest post is originally posted at https://emptywee.blogspot.com

The post Stackstorm: from Nagios integration to Openstack automation appeared first on StackStorm.

Automation Happy Hour #10 – Designing a Remediation Solution

$
0
0

It’s time for the next Automation Happy Hour, the first one of 2016!

This time we have a mystery guest visiting us (not a mystery to us, of course, we know this uber-active members of the ST2 Community very well but are not going to reveal his name yet). He is giving us an interesting use case to take apart and put back together, live on the hangout.

So come hang out with us:

Register for Automation Happy Hour #10

See you there on Friday the 22nd!

Patrick Hoolbook StackStorm

Patrick Hoolboom
Stormer

The post Automation Happy Hour #10 – Designing a Remediation Solution appeared first on StackStorm.

StackStorm and ChatOps Actions with confirmation

$
0
0

January 21, 2016
by Igor Cherkaev aka eMptywee

Originally published at http://emptywee.blogspot.com/2016/01/stackstorm-and-chatops-actions-with.html

Before moving to Openstack integration I’d like to post a short article about highly demanded feature, which is going to be implemented and supported natively out of the box by StackStorm one day, – Chatops Action Confirmation.

In short, some actions, requested from chatops, may indeed be dangerous and typo errors or incorrectly entered values may harm your system or lead to unexpected, unpredictable and undesirable results. That being said, it would be really nice to ask the user who issued the command to confirm his or her intentions to execute it.

So for now we have to do it on our own. And I’ll tell you what – it is not really difficult. We will examine two chatops aliases and I will elucidate on the things happening under the hood when these aliases are triggered.

Let’s begin and design our confirmation action and wrap it into the appropriate action-alias. If you want to quickly deploy the pack with all the actions and aliases right away, you can do so by running the following command:

st2 packs.install packs=st2chat_confirm register=all
repo_url=https://github.com/emptywee/st2chat_confirm.git

confirm_exec.meta.yaml (metadata file)

When I was experimenting with it, I tried different approaches and initially it was an action-chain. Perhaps, there’s a better way to directly execute st2.kv.set action from the alias, but I haven’t found it yet. Either it’s impossible to do, or it’s poorly documented. All we need to do is pass username of the person who executes the action (triggers the alias). So, we will use a simple action-chain with only one action designed to construct a proper key for the StackStorm data store.

---
# Action definition metadata
name: "confirm_exec"
description: "Confirm action execution"
runner_type: "action-chain"
enabled: true
entry_point: "workflows/confirm_exec.yaml"
parameters:
  exec_id:
    type: string
    required: true
    description: "Action execution to confirm"
  skip_notify:
    default:
      - save_key

We will pass one parameter to the action-chain, which in its turn will pick our chatname and stick it all together as a key. We need to do that because we do not want somebody else to confirm actions that were fired by you.

confirm_exec.yaml (action-chain)

The action chain itself is pretty simple:

---
name: test.confirm_exec
enabled: true
action_ref: st2chat_confirm.confirm_exec
description: Confirm potentially dangerous execution
formats:
  - display: "confirm <execution id>"
    representation:
      - "confirm {{exec_id}}"
ack:
  format: "Confirming action!"
  append_url: false
result:
  enabled: false

Feel free to adjust to your own needs here, don’t forget it’s just an example. This alias will trigger the action-chain once you give a command similar to ! confirm 56a01f468e326f6c51a3d4a9. Of course you can go ahead and replace execution id with some random number or magic word. It doesn’t really matter.

Now, let’s design our potentially dangerous action! I will use mistral workflow as an example, but there should be no problem to use the same approach for action-chains. Or should be, since a simple action-chain doesn’t really have mechanisms to implement waiting on user actions. But this is up to you to explore.

wf_with_confirm.meta.yaml (metadata)

Here’s our metadata for the potentially dangerous action!

 ---
  description: "test wf with confirm from chatops"
  runner_type: "mistral-v2"
  tags: []
  enabled: true
  pack: "st2chat_confirm"
  entry_point: "workflows/wf_with_confirm.yaml"
  uid: "action:st2chat_confirm:wf_with_confirm"
  parameters: 
    hostlist: 
      required: true
      type: "string"
      description: "a list of hosts"
    param1: 
      default: ""
      type: "string"
      description: "Some parameter"
  ref: "st2chat_confirm.wf_with_confirm"
  name: "wf_with_confirm"

In this example we are doing something (literally doing something!) to a list of hosts. Therefore, we will need to confirm it! We will pass a list of host names as hostlist and some arbitrary parameter param1.

The workflow itself is represented on the diagram below.

https://stackstorm.com/wp/wp-content/uploads/2016/01/flow_diagram.jpg

Let’s go step by step over the workflow.

  • First step here is to publish a few variables which we’ll refer to later, this step is optional and is placed here only for convenience. We publish chat_user, source_channel, and exec_id variables here. You will see why later;
  • Second step is there to throw a message into the channel asking the user to confirm the action execution;
  • Next, we wait for about 30 seconds for the action to get confirmed, and if it’s confirmed we take the execution one way, if it’s not – the other way;

Yes, it’s that simple. This workflow can be used a starting point for every dangerous action you design. I think that we can even pass a name of the desired workflow to get executed after confirmation. That way we won’t have to copy and paste the same code in each such action. Code re-use is a really good thing to always keep it in mind.

wf_with_confirm.yaml (workflow)

The mistral workflow itself is quite simple as well:

---
version: '2.0'

e_playground.wf_with_confirm:
  type: direct
  input:
    - hostlist
    - param1
  tasks:
    publish_data:
      # [297, 28]
      action: core.noop
      publish:
        chat_user: <% env().get('__actions').get('st2.action').st2_context.parent.api_user %>
        source_channel: <% env().get('__actions').get('st2.action').st2_context.parent.source_channel %>
        exec_id: <% env().get('__actions').get('st2.action').st2_context.parent.execution_id %> 
      on-success:
        - post_confirm_message
    post_confirm_message:
      # [286, 163]
      action: chatops.post_message
      input:
        channel: '<% $.source_channel %>'
        message: '@<% $.chat_user %>, the action you have requested is dangerous. Please, confirm by issuing "! confirm <% $.exec_id %>" command. You have 30 seconds to confirm it.'

      on-success:
        - wait_for_confirmation
    wait_for_confirmation:
      # [286, 304]
      action: st2.kv.get
      input:
        key: '<% $.chat_user %>_<% $.exec_id %>'

      retry:
        count: 10
        delay: 3

      on-error:
        - post_not_confirmed
      on-success:
        - post_confirmed
    post_not_confirmed:
      # [456, 434]
      action: chatops.post_message
      input:
        channel: '<% $.source_channel %>'
        message: '@<% $.chat_user %>, I have not received confirmation from you within 30 seconds. The execution has been aborted.'

    post_confirmed:
      # [97, 445]
      action: chatops.post_message
      input:
        channel: '<% $.source_channel %>'
        message: '@<% $.chat_user %>, The action is confirmed. Proceeding...'

Take a look at the first task there. Notice the long path to the variables we need. Perhaps, there’s a better way to get to them and store them, but I couldn’t figure it out yet. If you did, please, share in the comments section below.

Key aspect here (why we actually use mistral workflow) is the retry section of the wait_for_confirmation task. Mistral allows you to retry the task for a set amount of attempts. Thus, setting 10 attempts with a 3-second delay gives us about 30 seconds to confirm the action.

Last touch would be wrapping it up in an action-alias.

test.yaml (alias)

---
name: st2chat_confirm.wf_with_confirm
enabled: true
action_ref: st2chat_confirm.wf_with_confirm
description: Test workflow with confirm. Starting point.
formats:
  - display: "do_something with <hostlist> <param1>"
    representation:
      - "do_something with {{hostlist}} {{param1}}"
result:
  format: |
    Execution ID {{ execution.id }} complete.

In the end

Reloading everything and trying to fire up the potentially dangerous action we have just created!
To reload actions and aliases metadata simply issue the following command:

st2ctl reload --register-all

https://stackstorm.com/wp/wp-content/uploads/2016/01/chat_example.jpg

Ta-dam!

GitHub repository is located here: https://github.com/emptywee/st2chat_confirm

Feel free to ask questions if you have any. As always, you are welcome to join the friendly and super-fast responding Stackstorm community at https://stackstorm.com/community/

Also, I’d recommend trying the StackStorm Enterprise Edition. It gives you that beautiful visual workflow editor and support from the StackStorm core team.

The post StackStorm and ChatOps Actions with confirmation appeared first on StackStorm.

StackStorm QuickTip: ChatOps your pack dev workflow

$
0
0

by James Fryman

Happy Monday! In today’s StackStorm quick tip, we are going to show you a way to rapidly test and deploy packs. This technique pairs a StackStorm action, packs.install, and an Action-Alias that we will create to allow users to rapidly test and deploy new ChatOps commands for themselves.

Let’s just dive in!

# /opt/stackstorm/packs/st2-flow/aliases/flow_deploy.yaml
---
name: "flow_deploy"
pack: "st2-flow"
action_ref: "packs.install"
formats:
  - display: "flow deploy {{ branch }}"
    representation:
      - "{{register=all}} {{packs=st2-flow}} {{repo_url=moc.buhtignull@tig:websages/st2-flow}} flow deploy {{branch=master}}"
ack:
  format: "Deploying flow ... standby ..."
result:
  format: |
    {% if execution.status == 'failed' %}
    Oh no! Failure. Check the execution results in the web console{~}
    {% else %}
    Successfully deployed flow{~}
    {% endif %}

Imagine if you asked your colleagues to type in that long line every single time they wanted to deploy a pack. It would never be used. However, a simple ChatOps alias, and now it is simple as a single chat command. Using something like this significantly decreases the barrier to entry of experimentation/learning/growing of StackStorm. Folks will be more apt to try something if they see and use tools that give them nearly immediate feedback and know they can safely revert to a known state if need be.

Easy win.

This also has an added benefit of enabling StackStorm adaptable to change. This is absolutely necessary for a successful implementation. When you get feedback, you can quickly turn concerns into wins and previous folks who might have been detractors will become quick allies. It is not hard to see the possibilities once the lightbulb turns on. You also start teaching everyone immediately. Indirectly, team members will see actions being executed, and know that “this is the way to deploy StackStorm code”. It’s quick and painless.

Random Thoughts

Q: This action is tied directly to the packs.install. What about a workflow? Seems like that would be a better way to structure this.

A: Yeah, probably. Whip that thing up, and rapidly deploy the fix. Viola. Everyone wins. You absolutely will find better ways to maintain this or a similar command as you learn how your users interact with it. This is functional, and also has no problems being upgraded.

Q: I would never use this in my environment. There is no security. Anyone can run this command!

A: That’s fantastic! I also would not suggest running something this open in a production environment. There is a sliding scale between usability and security. This is very cleary leaning toward the usability end of the spectrum. But, by being able to rapidly iterate, you could build out something like Confirm ChatOps Action (credit: Igor Cherkaev), and implement the security you need. Combine that with fast iterations, you can grow something suitable for even the most stringent of environments.

Q: Could I use this pattern to deploy, say my SuperCoolDisruptingApp?

A: YES! When you provide smart people tools to do their job, you’ll be amazed how fast they are adopted. Use ChatOps to reduce friction in daily life where possible.

Let’s get going!

The keys: do not let great be the enemy of good, and constantly iterate. Your automation journey begins with the first step. Take this with you, it’s dangerous out there alone.

dangerous out there!

Want to see more StackStorm Quick Tips or have a tip of your own share? Let us know! Send us a tweet: (@Stack_Storm) with the hashtag #st2quicktip. Visit us at https://stackstorm.com to learn more about the product and team.

The post StackStorm QuickTip: ChatOps your pack dev workflow appeared first on StackStorm.

Unifying disparate applications into the One System

$
0
0

January 29, 2016
By James Fryman

Originally published at http://devops.com/2016/01/29/unifying-applications-into-one-system

Let’s talk about a real problem that all of us have faced at one point or another: keeping track of a single thread of work across many disparate tools. Regardless of the specific industry a company operates in, as a company grows, back-office applications in support of the business begin to accumulate. Many knowledge based companies have some sort of communication tool, some sort of project tracker, and some support tracker. These are tools that aim at being more effective with daily business process. Conversations suffice until they do not, and tools are implemented as the need arises. Every tool that was added has purpose, solves a critical need, and made you and/or your team more productive.

At some point however, this changes. Discovery starts to become a major issue as usage patterns between different tools leaves solos of data. It becomes hard to correlate the different company pipelines that ultimately drive your business: the pipeline to care and communicate for customers, the pipeline to deliver new features, and the human interfaces involved in each. This is only intensified by team members that work on different project with different tools and people, you introduce team members from a timezone not your own, the sheer quantity of work… how many ways can you name how not just conversations are lost, but context

Commonly, teams attempt to solve this in a few ways:

  • Rules! Specific guidelines (sometimes suggestions, sometimes mandatory) on how and where to have conversations and to store data.
  • Integrate! Write data transforms to move necessary data from system X to system Y as necessary.
  • Go all in! Choose a suite of tools that takes care of all of these for you.
  • Make it “Future You”‘s problem. It’s fine as is, and not really an issue.

At StackStorm, we ran into this problem. We have two ticketing systems (GitHub issues and Jira), a service desk tool (reamaze), and a chat client (Slack). The solution we use at StackStorm is one that I borrowed from my time at GitHub. One of my colleagues setup a really cool hook into Hubot that listened in our chat rooms for conversations we were having related to a GitHub Issue, a Pull Request, or even a code commit. When someone mentions one of these things, Hubot would grab a chat log plank, and cross-link the permalink to the Issue or Pull Request.

https://stackstorm.com/wp/wp-content/uploads/2016/01/bf7487ce-9ebd-11e5-87cf-657e8d89cc32.png

But, that’s just GitHub. Context matters across all tools, and gives team members additional flexibly in learning and gaining knowledge on their own. So, we took our Support Tool, reamaze, and did the same thing!

https://stackstorm.com/wp/wp-content/uploads/2016/01/687474703a2f2f692e696d6775722e636f6d2f6d4e37777851432e706e67.png

  • In times of speed, breadcrumbs allow you to piece together puzzles from where travelers have once voyaged. May not be the entire puzzle, but having background greatly helps.
  • In times of documentation, said breadcrumbs allow you to use the same investigative skills to assemble a better history.

This is one part of a set of behaviors that helps create a dynamic web of information. By seamlessly having a mechanism to associate conversations and issues/pr/tickets/whatever, it becomes much easier to have conversations happen whenever they need to (serendipitous interactions ftw) and still get context to team members when they’re available.

This matters because: There is only one system.

Before we get started…

Full disclosure: I am affiliated with StackStorm the company building StackStorm the tool. That being said, the ultimate goal here is to illustrate the pattern of how harness the recent chat culture change using an event-driven framework with the hopes of regaining just a modicum of sanity in your daily life. If you’re interested in learning more about StackStorm and how it ties into the overall automated troubleshooting and autoremeditaion space, take a look at our ChatOps Pitfalls and Tips by Dmitri Zimine. That should give you a good background on why we used StackStorm instead of say… just a small script.

Ok, on to business!

The Sensor

This workflow begins with a sensor. Inside of the StackStorm-Slack integration is a sensor class connects to the Slack Real-Time Messaging API. The first place to begin is with Sensors. The official Slack pack contains a sensor. This sensor uses the Slack RTM to connect to Slack and listen for messages in rooms that it is associated with. Each message is then sent as an “event” to StackStorm which I can create rules that will trap certain events and kick off.

Rules

Now that the sensor is emitting triggers into the system, I need to find a way to take an action when someone mentions an issue or ticket. The mechanism here is via a rule. Rules check triggers emitted into the system via sensors against a series of checks, and then executes an action or workflow if matched. A trigger can match to many rules.

Let’s create a rule to watch Slack for discussions related to reamaze

The first element in the criteria block is trigger.text. In the rule, the trigger itself is just referred to as trigger as opposed to slack.message.text. We want to see if the text propery contains a pattern related to our reamaze issue tracker. I chose contains out of the large list of comparison operators, and made sure the pattern matches what I’m looking for. Last but not least, the action block. This block is basically the next operation. Here, I can choose a single action or a workflow to kick off, and even grab data from the trigger payload to pass to the action. In this case, I opted to create a new workflow for my purposes here, and made sure to grab a few keywords that I needed to do processing.

At this point, I have a rule matching and now I need to create the action necessary to process the trigger.

Actions and Workflows

Next, we get to creating the actions. The goal is to ensure that anytime a discussion randomly breaks out about a reamaze support ticket, that @estee-tew posts the Slack permalink to the support ticket. With the trigger payload extracted in the above rule, the workflow will need to:

  • Take the text of a user comment and extract reamaze issue URL
  • Calculate the Slack Permalink URL of the matched message from the collected data.
  • Post the Slack Permalink on the matched reamaze issue ticket.

Inside the reamaze pack, I can see that I have the ability to create_message. This action takes three parameters: slug, message, and visibility. In our rule above, the action that was kicked off when the critera matched desired slack messages is stackstorm.crosslink_slack_to_reamaze. As of right now, this does not exist, so that is the next step. For brevity’s sake, you can take a look at the action metadata on GitHub.

This is a simple Action Chain. In as much as it just does one task after another. The tasks here are designed to be small and portable so they can be re-used. Let’s quickly inspect each of the actions and walk through what it is that lies before us now.

Step 1: Permalink to chat history

The goal is to create a way to crosslink a Slack permalink, so let’s start there. This starts with the get_permalink action above. While the history permalink is not in the trigger payload (or even in the official API, for that matter), Slack permalinks are actually not too terribly difficult to figure out. The first action takes two parameters (channel and timestamp), and then spits us out our permalink. We know we’re going to publish the permalink variable that can now be globally used in the workflow in the future. In additon, the next step takes us to the sanitize_message task. You can take a look at the python code for this action upstream.

Step 2: Get support issue data

The next step actually happens in two tasks: sanitize_message and get_reamaze_slug. The immediate next step, sanitize_message, is necessary to clean up the output from Slack. In the message payload, URL data is sent to us as a special “escape sequence” which doesn’t do the rest of the actions much good. This action, detailed below, is simple enough to be reused in several other workflows. Again, take a look at the action itself The run() method in this python-runner task is the entry point from StackStorm, and this cleans up the text and returns it back as a plain URL which we can then pass to the next action, get_reamaze_slug. This returned information gets us what we need in order to call our final action, reamaze.create_message. We’re able to publish the permalink slug that was shared and discussed in chat. Now we know what is being discussed.

Step 3: Post the crosslink

In this step, a the link is actually created. Here we are! The finish line! Woot! The only thing that is essential to do is to make sure we only set the note as an Internal Only note to avoid sending weird links to our friends. The next step is the crosslink_slack_to_reamaze action. At this point, we have all the data we need, so it’s just execution.

Permalink from Slack. Crosspost to reamaze

https://stackstorm.com/wp/wp-content/uploads/2016/01/687474703a2f2f692e696d6775722e636f6d2f6d4e37777851432e706e67.png

and now, with GitHub…

The premise is simple enough. Included in the upstream repository also includes examples for how to setup similar context mapping with StackStorm. Take a look at https://github.com/stackstorm-packs/st2-crosslink_chat_with_applications. Same process, code reuse, and the same end effect.

https://stackstorm.com/wp/wp-content/uploads/2016/01/687474703a2f2f692e696d6775722e636f6d2f6d4e37777851432e706e67.png

Unknowns

  • This workflow is not for everyone.
  • We expose internal-only links that are unaccessible by users, and it may be confusing to see random links in issues around GitHub. Why?! What are they?!
  • Aliens!?

There are many more that will come up, but the key facter to address here is that it’s not difficult to put this together, and it’s not that difficult to change. And that’s ok. We’ll have questions to be answered, but being able to try something out super quickly was indeed satisfying. (In truth, the workflow went up faster than the blog. :P)

Wrap up

For many reasons, it is unfeasable to capture many fluid conversations in many different tools. The answer is not to move data around, but to leverage humans and provide them a helping hand. This is by no mean a solution, but it begins to provide less friction in the daily work. Over time, add enough of these friction reducers, and then suddenly… it’s no longer a panic. This also reinforces the idea that there is not a collection of systems, but rather a single system. The single company. The tools you selected are obviously necessary as we defined at the beginning, but tools should not be dictating the communication structures of your teams, but rather informing them. Removing the ability for silos to form allows data in both bits and ideas to flow and move around. This can even be expanded to do much more…

Until next time!

The post Unifying disparate applications into the One System appeared first on StackStorm.

StackStorm 1.3.0 is here!

$
0
0

January 29, 2016
by Dmitri Zimine

1.3.0

Fellow automators, we are happy to announce StackStorm 1.3. In this “Holiday release” (yes most of the work took place around the holidays) we took a break from “big features” and focused on addressing key learnings from extensive field usage, turning feedback from our expert users, and our own take aways from internal StackStorm use, into practical product improvements. The highlight of the release is a long-awaited ability to restart a workflow from a point of failure. We have been pushing it through for quite a while, first in upstream OpenStack Mistral, than exposing it via StackStorm, and now it’s ready for the prime time. With other highlights – making it easier to debug rules, track complex automation executions, and keep the history size under control – 1.3 release is a major step up in making StackStorm performant, operational and convenient.

Read on to learn about release highlights and what is coming up next. To upgrade, follow this KB.

Feature highlights

1. Rule debugging

StackStorm is built to be as transparent – so users trust the system to take powerful actions. However, we have learned that debugging a rule could be frustrating even for a StackStorm expert. You configure a sensor and set up a rule to call an action on an external event. The event fired, but action did not execute. Where did it fail? Did the event come to a sensor? Did the trigger instance got fired? Did the rule match? Was the action scheduled? And where do I look for all of it? v1.3 brings the tools to find the answers.

Specifically, we put in place some missed links to track the whole pipeline; added extra options to CLI commands and improved st2-rule-tester to enable an end-to-end rule debugging workflow for a variety of scenarios. Traces and trace-tags come handy here, too (see below). Check rule troubleshooting docs for instructions; a blog post with details is coming shortly.

2. Traces improvements

Firing multiple actions on external events, nested workflows, triggering more actions and workflow on action completions via rules and action-triggers give great power. But operating and troubleshooting complex automation requires good tooling. We have been improving transparency: few versions ago (0.1.3), we introduced traces and trace-tags to gain everything comprising a full end-to-end automation execution.Now, ased on the field feedback from our largest users, we are bringing extra options to help ops get to the crux of the problem faster, with less noise. With new improved trace you can:

  • View a causation chain of all the trigger instances, rule invocations, and action executions – getting everything that leads to a failed execution, for instance.
  • Filter out the noise – show only executions, triggers, rules, or turn off all action-triggers that didn’t lead to triggering with --hide-noop-triggers flag.

Trace tags for an action execution can now be supplied in the WebUI. Viewing traces are still in CLI only: a convenient view in WebUI to see the whole chain of events is something we are thinking next; contributions welcome!

3. Keeping history trimmed

Running StackStorm at scale produces hundreds of thousands action executions. Over time the ever-growing operational history begins to impact performance. To make it easier to keep the history size under the tap, we introduce a garbage collector service that auto-trims the DB per your desired configuration. Commands are also available to purge history manually by a variety of criteria.

“But what is happening with my year worth of operation execution records? I need the audit, and want to do some analytics on it!” Not to worry: all audit data, all the details of executions are stored in structured *.audit.log files. Save them, grok them to your Logstash or Splunk, slice and dice them for insides of your operations. A dedicated audit service is on the roadmap for Enterprise Edition; it will provide a native indexed searchable view for years worth of history, with analytics and reporting on top (sign up for “alpha” soon).

4. Re-run workflow from a failure point

With transparency of workflow executions you know exactly which task has failed; we commented elsewhere on the return of workflows as the backbone of event driven automation – take a look if you are interested in the subject.

But what exactly are you supposed to do when a workflow fails – even if workflow tells you which one fails, now what? When, after a long preparation, workflow creates 100 instances and fails on 99th… and you know exactly the point of failure, it still sucks. What if it failed by external conditions, e.g network connectivity lost or a target service unavailable? Can I fix the conditions, and just continue the workflow execution from where it failed? From 1.3 the answer is “yes you can”.

Now you can re-run a failed workflow from a point of failure. Do st2 re-run and point it to a failed task (or tasks!); StackStorm re-runs the failed task with the same input, and continues workflow execution. Read here how to do it.

This ability to recover from failure, along with clarity of execution state, is a highlight of the 1.3 release, and one big reason why workflows are triumphing over “just scripts”.


As usual, there are a number of smaller improvements, each to make StackStorm one bit better and one notch easier to use. Check the CHANGELOG to appreciate the improvements.

We are especially happy with community contributions. Folks from Plexxi, SendGrid, TCP Cloud, Netflix, Move.com, and Dimension Data, along with individual contributors brought in quite a few features and fixes. My personal favorites are the support for containers from Andrew Shaw, HipChat improvements for Chatops from Charlotte St. John, and SQS AWS actions from Adam Hamsik and kuboj. Thank you ALL from behalf of all StackStorm users!

Upgrading 1.2 -> 1.3

Please follow this KB for upgrading. We strongly recommend migrate if/when possible, but the in place-upgrade is tested and should generally work. Always keep the content separated so that you can deploy full automation on a new instance of StackStorm.

What’s next

These weeks we are heads down improving StackStorm installation. All-in-one installer is a great way to get the turn-key StackStorm installation for evaluation on a clean system. However we understand the need for a custom package-based installations. Stay tuned for proper self-contained deb/rpm packages, they’re just around the corner. And a docker image with StackStorm is in the works, as an alternative for quick evaluation.

Our immediate next focus is managing and operating automation content. A Forge for convenient sharing of integration and automation packs; an end-to-end user flow and tooling support for pack development, deployment, and updates; pack versioning and dependencies, UI improvements to and much more.

And, of course, ChatOps. We see it as a focal point of operations, bridging team work with automation in a magical way. StackStorm brings ChatOps as essential part of end-to-end solution, stay tuned for improvements (some hints here).

For a year of upcoming StackStorm functionality, see ROADMAP.

As always, your feedback is not welcome, it is required! Leave comments here, share and discuss ideas on stackstorm-community, and submit PRs on Github. We are excited to see StackStorm maturing, and together with our user community we will make it great.

The post StackStorm 1.3.0 is here! appeared first on StackStorm.

On Force Multiplication and Event Driven Automation

$
0
0

February 3, 2016
By James Fryman

Recently, I have found myself reflecting on the statement “Be a force multiplier”. This usually comes to mind when faced with some sort of burn-out: hearing in indirectly from a colleauge or friend, or experiencing it first hand. The intent is good and aligns well with some core tenants of DevOps. Force multiplication fits into the DevOps ethos by encouraging the need to cross-train and collaborate. By working together and sharing knowledge about respective domains (Development or Operations), team members gain empathy for each other. This in turn has a downstream effect of now enabling better collaboration around the repair/growth/operation/expansion of the delivery pipeline.

The only challenge that I have seen over and over again is that by the time that this idea of “force multiplication” is needed in a team, one or more major bottlenecks exist. These bottlenecks are often real and a result of an imbalance of resources. Servers arriving faster than there are resources to rack/stack/configure/turn-up. DBAs cannot handle the number of schema changes needed to be reviewed/tested/deployed. Developers must wait on a certain person or persons who have access to publish a package before it can “go live”. You probably have your own bottleneck that you see very clearly in your own mind.

The next question: Have you (or someone you know) attempted to be a “force multiplier”? The answer always is complex, but a there is always a common theme in noble attempts at team cleanup: lack of training. Think about it: have you been taught how to be a force multiplier? How to build well formed teams? How to effectively pass on knowledge? To compound issues even further, our current incentive structure actually celebrates the “Heroes” and “Unicorns” of the world, calling out these as examples of success. Our economy rewards those first to market, and team building and normalization is often not on high priority for budding startups of today. Unless improvement efforts have direct impact to the bottom line, then it often is not a priority. The folks that are brave enough to still even take on the challenge of being a “Force Multiplier” in these conditions often find little success because knowledge transfer must happen in synchronous fashions: code-pairing, over-the-shoulder demonstrations, etc. These are expensive activities in both time and energy. Opportunity cost is now lost because one resource is cross-training another. Eventually the benefics will be realized, but not today…

The amount of work is too large. As a result, the can is kicked down the road until such a time that the pain is unbearable and something must be done. At this point, everyone wants to burn down the offending code and start again. But next time, we’ll learn. We won’t make the same mistakes we did last time.

Bite-sized changes

The problem is that when looking at the road in front of you, you’re constantly optimizing for the next day or week as opposed to months and years ahead. In the world of quarterly returns, this is the incentive that drives us. Thus, by the time problems are real problems, it is easy to immediatly begin the bikeshed conversation and begin designing v2. The next step is to re-adjust what the optimization factor. Growing the meat-cloud and getting additional resources often takes too long (3-6+ month onboard), the time cost of cross-training can be too much, and over-working resources can only go so far. What is the answer?

Level the playing field

One of the ideas that I share around ChatOps and Event Driven Automation is to expose small tasks to users. By doing this, you allow team members and others in your company to “consume” actions that you curate. As the curator, you can expose safe actions to users and allow them to do things once relegated to a single individual or team. I’d like to share a real-world story with you and show you how we solved it.

Bottlenecks at StackStorm

Recently, our team was bottlenecked in releasing updates to our Puppet module for StackStorm. The team could make changes all day long in the test environment, but to get changes out to the world was dependent on a single person releasing code to the Puppet Forge. Non-ideal. Let’s break it down. To release a module to the forge, a user must know:

  • Know how to make a change to the puppet module.
    • Update module itself
    • Update metadata
    • Update git repository (tags)
  • Know how properly package up the module for release to the forge
  • Know the credentials for the Puppet Forge.

At face value, this seems minor. Throw these commands into a README, and let others just copy/paste commands. But, my team is not full of Puppet experts. They are developers, eager to help solve interesting problems. But, because of this barrier to release, the natural reaction was to shy away from making changes. Not at all because of capability or willingness, but to avoid the pain of friction involved with releasing the code. This meant that any change to the codebase usually required at least two people (change and release). Likewise, any changes that were small or simple… naturally got relegated to Puppet people because they knew how to manage the debt and navigate the waters.

Intead, let’s sprinkle some magic ChatOps dust.

The Setup

First, let’s setup our user interface: ChatOps. UX is a topic that will come up over and over again with ChatOps, so the best place to begin is to decide how to expose commands to colleagues and users. The first thing to setup is the ChatOps Alias.

---
name: "publish-puppet-st2"
description: "Release puppet-st2"
action_ref: "stackstorm.publish-puppet-st2"
formats:
  - "puppet publish puppet-st2 {{branch}}"

Source: https://github.com/stackstorm-packs/st2-publish_puppet_forge/blob/master/aliases/publish-puppet-st2.yaml

I want an all-encompasing command that a user should have to input a minimal amount of information toward. The goal is to have a big red button that can be mashsed, and magically a Puppet module is released. This should now happen anytime a user types in !puppet publish puppet-st2 <somebranch>, StackStorm will run the stackstorm.publish-puppet-st2 action with the branch attribute set to whatever the user types in. We choose to re-use the puppet namespace since it is already populated with similar actions.

The next step is to setup some accompanying Action Metadata for the new stackstorm.publish-puppet-st2 action. We’ll want this to run a new workflow that will take care of all the actions we discussed above. The only variable that I need to get from the user is the branch parameter, so writing the metadata should be a snap. We’ll only take a look at the workflow today.

---
vars:
  run_host: 'localhost'
  repo_dir: '/tmp/puppet-st2'
  repo_url: 'moc.buhtignull@tig:StackStorm/puppet-st2.git'
  forge_file: '~/.puppetforge.yml'
  forge_username: '{{ system.puppetforge_username }}'
  forge_password: '{{ system.puppetforge_password }}'
chain:
  -
    name: 'clone-puppet-module-from-git'
    ref: 'core.remote'
    params:
      cmd: 'git clone {{ repo_url }} {{ repo_dir }} -b {{ branch }}'
      hosts: '{{ run_host }}'
    on-success: 'bootstrap-puppet-module'
    on-failure: 'cleanup'
  -
    name: 'bootstrap-puppet-module'
    ref: 'core.remote'
    params:
      hosts: '{{ run_host }}'
      cmd: 'bundle install'
      cwd: '{{ repo_dir }}'
    on-success: 'cleanup-vendored-gems'
    on-failure: 'cleanup'
  -
    name: 'cleanup-vendored-gems'
    ref: 'core.remote'
    params:
      hosts: '{{ run_host }}'
      cmd: 'rm -rf vendor'
      cwd: '{{ repo_dir }}'
    on-success: 'set-puppetforge-credentials'
    on-failure: 'cleanup'
  -
    name: 'set-puppetforge-credentials'
    ref: 'core.remote'
    params:
      hosts: '{{ run_host }}'
      cmd: "echo \"---\nurl: https://forgeapi.puppetlabs.com\nusername: {{ forge_username }}\npassword: {{ forge_password }}\" > {{ forge_file }}"
    on-success: 'tag-puppet-module'
    on-failure: 'cleanup'
  -
    name: 'tag-puppet-module'
    ref: 'core.remote'
    params:
      cmd: 'bundle exec rake module:tag'
      hosts: '{{ run_host }}'
      cwd: '{{ repo_dir }}'
    on-success: 'build-puppet-module'
    on-failure: 'cleanup'
  -
    name: 'build-puppet-module'
    ref: 'core.remote'
    params:
      cmd: 'bundle exec rake build'
      hosts: '{{ run_host }}'
      cwd: '{{ repo_dir }}'
    on-success: 'upload-module-to-forge'
    on-failure: 'cleanup'
  -
    name: 'upload-module-to-forge'
    ref: 'core.remote'
    params:
      cmd: 'bundle exec rake module:push'
      hosts: '{{ run_host }}'
      cwd: '{{ repo_dir }}'
    on-success: 'push-git-tags'
    on-failure: 'cleanup'
  -
    name: 'push-git-tags'
    ref: 'core.remote'
    params:
      cmd: 'git push origin --tags'
      hosts: '{{ run_host }}'
      cwd: '{{ repo_dir }}'
    on-success: 'cleanup'
    on-failure: 'cleanup'
  -
    name: 'cleanup'
    ref: 'core.remote'
    params:
      hosts: '{{ run_host }}'
      cmd: 'if [ -d {{ repo_dir }} ]; then rm -rf {{ repo_dir }}; fi'
    on-success: 'remove-puppetfile-credentials'
    on-failure: 'remove-puppetfile-credentials'
  -
    name: 'remove-puppetfile-credentials'
    ref: 'core.remote'
    params:
      hosts: '{{ run_host }}'
      cmd: 'if [ -f {{ forge_file }} ]; then rm -rf {{ forge_file }}; fi'

Source: https://github.com/stackstorm-packs/st2-publish_puppet_forge/blob/master/actions/workflows/publish-puppet-st2.yaml

At the top of the file includes our vars section. The puppet-blacksmith application was not built to be run with multiple users, so our workflow needs to be able to adapt. As such, we need to know that the gem will expect a credential file (forge_file) with a username (forge_username) and password (forge_password). We also need to know where our staging directory is (repo_dir), where the upstream target is (repo_url). Simple enough. The next few steps, clone-puppet-module-from-git, bootstrap-puppet-module, cleanup-vendored-gems, and set-puppetforge-credentials ensure the build host is setup properly. These actions serially download the repository from Upstream, runs all bootstrap commands, attempts to ensure a prestine directory, and then sets up the puppet-blacksmith forge file. At this point, nothing has actually been done. Just some preparation. It’s important to note the 3rd step here (cleanup-vendored-gems). This was a small step that was often forgotten, and ended up creating archives in the size of Megabytes as opposed to Kilobytes which is more reasonable and expected.

The final steps, tag-puppet-module, build-puppet-module, upload-module-to-forge, and push-git-tags, are where the bulk of work occurs.The next steps are focused on running several rake tasks, as well as then tagging the git repository and re-publishing the package upstream. Most of these actions were enabled by the puppet-blacksmith gem, but now are encapsulated in a nice workflow that is easily consumable.

And sure enough, if you build it, they will come…

https://cloud.githubusercontent.com/assets/20028/12429874/3f5246de-beb2-11e5-8c7c-ffd595575100.png

(https://cloud.githubusercontent.com/assets/20028/12429875/3f536e1a-beb2-11e5-8fc2-e340758daca7.png

Techniques like this directly enable force multiplication within your team. Essentially, your role shifts from a person “responsible” for delivering to the person for “enabling” delivery. This is a very small example, but powerful. Enabling others on your team to be a force multiplier enables them to keep working, enables you to focus on more important things, and also creates a new degree of transparency that may not have existed before. Everyone knows when software is released, anyone has the ability to do this. Add up enough of these small building blocks, and suddenly team members are more apt to take risk and help drive change knowing there is a safety net behind them.

Worth Consideration

Two very interesting points were presented to me that are worth discussion here:

Agile Manifesto, rule #1: Individuals and interactions over processes and tools. Tools that tries to enforce a workflow of a human? GTFO!

How far does this paridigm extend? For sure, “process” is the worst. When invoked, it usually means a large amount of paperwork or rules that must be strictly adhered to. Downside is that many of said process is manual in nature, and as a result error-prone. Likewise, companies that implement a tool before either understanding what they want to acheive or at the very least, defining a set of principles, tools end up shaping how the company works as opposed to the other way around. The point here is that humans are in charge.

Agreed. What is unreasonable here is the underlying expecation that exists here and across the IT industry: technologists must know an immense amount about an immense number of things. Even in my own domains of expertise, I can think of nothing more demotivating than trying to remember how to deploy code that I haven’t touched in 3+ months. Eventually I’ll remember, but it’s a drag and introduces unnecessary friction. Now, play that out in a larger team and multiply.

I will become redundant

I have yet to see this happen. What instead happens is collaboration. Developers can focus on shipping and keeping their code up-to-date without bugging operations, and operations can care about aggregate problems (capacity, power, storage) as opposed to transactional tasks like “push this code” or “reset this password”. Most devs I know are not afraid to get dirty, but its not where they would rather spend time. Devs wanna develop. If you can enable them with better tools to do exactly that, everyone wins. The glucose you were once burning on smaller tasks can and often do become self-service, and you get to go and create even more cool interfaces for users to consume.

Wrap Up

Bottlenecks exist. They can and will continue to pop up as companies grow and expand. Sometimes you may find yourself in a situation where bottlenecks accumuluate over time as a result of technical debt, while othertimes you join a new team and that debt may already be gaining interest on amounts owed. Either way, the situation exists where something needs to be done. Instead of going directly for the RPG, burning down the house and starting over, consider smaller approaches to enable others to do the things you do.

Some thoughts to take with you today:

  • Tend your technology garden: curate, don’t operate
  • Make small, transparent changes for lasting effect
  • Grow it together: don’t control the change

Until next time!

The post On Force Multiplication and Event Driven Automation appeared first on StackStorm.


Watching the watcher: How to test and debug rules and trace what StackStorm does with triggers?

$
0
0

February 4. 2016
By Manas Kelshikar

We have always wanted StackStorm to be much more transparent than older run book automation systems so that users trust it – so they allow StackStorm to do more and more of the work such as quashing 2am pages via auto-remediation.

Recently we’ve added some capabilities that further increase StackStorm’s transparency.

This post focuses on a few features that help follow the breadcrumbs of an event-driven automation. It specifically provides ways to answer the questions –

  • Why does this rule not work?
  • What did StackStorm do with the event that it received?

We will put these question in context of a StackStorm Auto-remediation. The example for this blog will use StackStorm to auto-remediate an application that at times has poor API response times. The cast for this plot will be StackStorm as the guardian and protector, Sensu as the watcher and an application that must be brought back to the light when it starts erring in its ways.

We will specifically demonstrate the use of st2-rule-tester as well as what we call Trace Tags. As always in these kinds of “tutorial” blogs – we include the actual StackStorm content.

The Setup

Pre-requisites

  1. Install the latest version of StackStorm as per these instructions.
  2. Install Sensu as per these instructions. It is recommended
    to keep StackStorm and Sensu on separate instances to isolate the services from each other.
  3. An application that at times has poor API response times and with well understood remediation steps. In this blog we will use a custom flask based python application that satisfies this requirement.

Configurations

  1. StackStorm is setup up with the sensu pack.
  2. Sensu is configured to send events to StackStorm.
  3. Sensu setup with check-http.rb plugin.
  4. Following check added in sensu server
    {
      "checks": {
        "app_response_check": {
          "handlers": ["default", "st2"],
          "command": "/etc/sensu/plugins/check-http.rb -u http://127.0.0.1:9999/square/10 -t 7",
          "interval": 60,
          "subscribers": [ "app_server" ]
        }
      }
    }
    
  5. StackStorm setup with a custom application remediation pack specific to the sample application.

Once the setup and configurations are in place, the application is started and Sensu monitoring is validated by consulting the Uchiwa dashboard. The application can be put in a bad state by running curl -X POST http://APP_SERVER/bad/10. Doing so will cause Sensu to recognize that the application is non-responsive and in turn an event is sent to StackStorm via the registered StackStorm event handler.

Now back to the original questions

If all goes well StackStorm Auto-remediation will fire and fix the applications performance. However, at times things do not work as expected or it is necessary to track down what StackStorm did in response to an external event. Here is how those questions can be answered.

Why does this rule not work?

Taking a step back, a rule comprises of –

  • A trigger to handle
  • Some selection criteria
  • An action to execute

Writing a StackStorm rule is a key step in setting up an event-driven automation. Often a non-working rule is symptomatic of using the wrong trigger reference or a bug in the selection criteria. In order to help debugging during rule development and even later if the payload of a Trigger changes StackStorm provides a command line tool st2-rule-tester.

Sample rule –

---
  name: on_app_response_check
  description: Sample rule that dogfoods st2.
  pack: app_remediation
  trigger:
    type: sensu.event_handler
  criteria:
    trigger.check.name:
      pattern: "app_response"
      type: "equals"
    trigger.check.output:
      pattern: "CheckHTTP CRITICAL*"
      type: "matchregex"
    trigger.check.status:
      pattern: 2
      type: equals
  action:
    ref: "app_remediation.remediate"
    parameters:
      app_server_host: "127.0.0.1"
      app_server_port: "9999"
  enabled: true

Use st2 trigger-instance list --trigger sensu.event_handler to get a list of all the sensu.event_handler TriggerInstances in StackStorm. Pick a suitable TriggerInstance from the generated list to use with st2-rule-tester. Head over to Triggers and Sensors for a general discussion on Sensor, Triggers and dispatching TriggerInstances.

Sample TriggerInstance already in StackStorm with some details omitted –

{
    "id": "569882f7aef3392a8c2a834d",
    "occurrence_time": "2016-01-15T05:26:15.730000Z",
    "payload": {
        ...
        "check": {
            ...
            "name": "app_response_check",
            ...
        },
        ...
    },
    "trigger": "sensu.event_handler"
}

Using st2-rule-tester to debug –

# st2-rule-tester --rule=/opt/stackstorm/packs/app_remediation/rules/on_app_response_check.yaml --trigger-instance-id=569882f7aef3392a8c2a834d --config-file=/etc/st2/st2.conf
2016-01-18 17:14:03,338 INFO [-] Connecting to database "st2" @ "0.0.0.0:27017" as user "None".
2016-01-18 17:14:03,391 INFO [-] Validating rule app_remediation.on_app_response_check for event_handler.
2016-01-18 17:14:03,430 INFO [-] Validation for rule app_remediation.on_app_response_check failed on criteria -
  key: trigger.check.name
  pattern: app_response
  type: equals
  payload: app_response_check
2016-01-18 17:14:03,433 INFO [-] 0 rule(s) found to enforce for event_handler.
2016-01-18 17:14:03,434 INFO [-] === RULE DOES NOT MATCH ===

The output identifies that the issue for the specific rule is with the criteria trigger.check.name. Fixing that to match
value from the payload will lead to –

# st2-rule-tester --rule=/opt/stackstorm/packs/app_remediation/rules/on_app_response_check.yaml --trigger-instance-id=569882f7aef3392a8c2a834d --config-file=/etc/st2/st2.conf
2016-01-18 17:26:05,415 INFO [-] Connecting to database "st2" @ "0.0.0.0:27017" as user "None".
2016-01-18 17:26:05,454 INFO [-] Validating rule app_remediation.on_app_response_check for event_handler.
2016-01-18 17:26:05,496 INFO [-] 1 rule(s) found to enforce for event_handler.
2016-01-18 17:26:05,497 INFO [-] === RULE MATCHES ===

A full description of the capabilities of this tool can be found here.

What did StackStorm do with the event that it received?

Once an event-driven automation is setup and StackStorm starts auto-remediation it is often necessary to track
down from source of the external event what StackStorm did with those events. StackStorm enables this through a feature called Trace Tags which allow a user to correlate events originating in external systems with a StackStorm automation.

Trace tags can be attached to TriggerInstances and ActionExecutions. Usually, Sensors or Webhook payloads tend to include trace tags that apply to TriggerInstances, this implies that it is necessary to have an understanding of the Sensor or the configured Webhook payload. Head over to documentation for an in-depth discussion on Traces.

Continuing with the previously setup example lets begin with a Sensu event. Sensu event payload can be obtained
using the Sensu events API.

Sensu event

# http http://sensu-server:4567/events

[
    {
        "action": "create",
        "check": {
            ...
        },
        "client": {
            ...
        },
        "id": "03cce13d-3dd9-41a8-a357-b1df62ab0705",
        ...
    }
]

Each sensu event has a unique id field which is used by the StackStorm Sensu event handler as the Trace Tag for the StackStorm TriggerInstance.

In this case that value is 03cce13d-3dd9-41a8-a357-b1df62ab0705. Use this value to obtain a StackStorm Trace.

# st2 trace list --trace-tag 03cce13d-3dd9-41a8-a357-b1df62ab0705
id: 5698439eaef3392a8c2a832a
trace_tag: 03cce13d-3dd9-41a8-a357-b1df62ab0705
start_timestamp: 2016-01-15T00:55:58.625104Z
+---------------------------+------------------+----------------------------------+
| id                        | type             | ref                              |
+---------------------------+------------------+----------------------------------+
|  5698439eaef3392a8c2a8329 | trigger-instance | sensu.event_handler              |
|  56983951aef3392ac6e7ba9c | rule             | app_remidiation.on_app_response_ |
|                           |                  | check                            |
| +5698439eaef3392a8c2a832c | execution        | app_remediation.remediate        |
|  5698439faef3392a8c2a832e | trigger-instance | core.st2.generic.actiontrigger   |
+---------------------------+------------------+----------------------------------+

The above Trace consists a list of activities that StackStorm performed. In this case those are the TriggerInstance created by StackStorm, triggered Rule and ActionExecution representing the performed remediation. Further drill down can be performed using familiar CLI commands like st2 trigger-instance get <trigger-instance-id>, st2 rule get <rule-id> or st2 execution get <execution-id>. This list effectively is the answer to question we started out with i.e. “What did StackStorm do with the event that it received?”.

Closing thoughts

Often the remediation steps in response to an event are not obvious. In those cases StackStorm can be setup to aid with troubleshooting – a practice known as facilitated troubleshooting. By having operators decide the best course of remediation, based on the troubleshooting data gathered by StackStorm, a remediation workflow can then be coded up in StackStorm that replicates trusted manual steps. Facilitated troubleshooting thus becomes a stepping stone to auto-remediation. StackStorm also provides some powerful tools like Flow Workflow editor and GUI based rules editors to aid in authoring of auto-remediations.

With the help of Rules debugging and Traces, StackStorm provides capabilities to quickly build out event-driven automations as well as track the lifetimes of automations. Using StackStorm to maintain and manage your automations helps increase their visibility by making the system observable and traceable leading to increased trust into the automations themselves. Sleep easy, and let StackStorm quash those 2am events for you.

The post Watching the watcher: How to test and debug rules and trace what StackStorm does with triggers? appeared first on StackStorm.

StackStorm, Yammer, and cat pictures

$
0
0

February 8, 2016
by Edward Medvedev

Less than a week ago Microsoft announced a plan to activate Yammer — its corporate social network — for every customer with Office 365 subscription. Yammer will be seamlessly turned on for everyone with a business or education account over the next two months, which means more and more people will rely on it in their daily communication. Pretty exciting!

If you’re a long-time StackStorm user, chances are you already know what’s going to happen. After all, we only write articles with words like “pretty exciting” in them when we have something great to show, and this one is no exception: today we’re proud to announce ChatOps integration with Yammer for both Community and Enterprise editions of StackStorm!

If you’re new to ChatOps, it’s a chat-centric way to enable or extend DevOps — especially when based upon StackStorm. With the help of our powerful rules engine, workflows, and more, you can execute actions from your chat app of choice, keep it visible for your team, and grow your automation patterns over time. Naturally, our own blog has a lot of articles on the topic, like the recent On Force Multiplication and Event-driven Automation by James Fryman.

Just like the last time, a charming bot assistant will accompany me in walking you through the installation process. Enter Ancient Psychic Tandem War Elephant.


1. Yammer account

Your bot will need a separate account and an access token. First, sign up as a new user; that will be your bot’s account. Activate it and have the profile set up:

Now create a token on https://www.yammer.com/client_applications; this step is pretty straightforward. Lastly, make sure your bot is a member or every group you want it to be on, both public and private.

You’re all set! We can move on to StackStorm.


2. StackStorm installation

Yammer integration is still experimental and takes some extra steps, but it’s nothing to be afraid of. First, make sure you have a fresh version of StackStorm (currently 1.3.0) installed, and ChatOps fully configured to use any other chat service.

If you’re doing a fresh install, Yammer won’t be listed in the Installer UI, so you’ll have to select any other service to have Hubot installed. You can enter anything you want as credentials: we’ll overwrite the settings in a moment.

If you already have StackStorm installed, you’ll have to stop Hubot and update the stackstorm/hubot Docker container first:

service docker-hubot stop
docker rmi stackstorm/hubot
docker pull stackstorm/hubot
service docker-hubot start

You’re all set now. Time to connect Hubot to your Yammer account.


3. Configuring Hubot

StackStorm Hubot container is controlled by the init script at /etc/init.d/docker-hubot. Make a backup, then open the script and find the docker run line inside start(). Depending on the version and the settings it should be around line 68 and look similar to this:

$docker run \
--net bridge --detach=true -m 0b -e ST2_AUTH_USERNAME=chatops_bot -e ST2_AUTH_URL=https://aptwe:443/auth -e HUBOT_SLACK_TOKEN=xoxb-18acd902ff28d7aebc778 -e ST2_WEBUI_URL=https://aptwe -e NODE_TLS_REJECT_UNAUTHORIZED=0 -e ST2_AUTH_PASSWORD=x6hgOCD4mWGe9LuOpsXZg0cu4OkCOPNz -e EXPRESS_PORT=8081 -e HUBOT_LOG_LEVEL=debug -e ST2_API=https://aptwe:443/api -e HUBOT_NAME=hubot -e HUBOT_ADAPTER=slack -e HUBOT_ALIAS=! -p 8081:8080 --add-host aptwe:10.0.2.214 \
--name hubot \
hubot \

Now we’ll have to change the adapter and add your Yammer token and groups:

  1. Change HUBOT_ADAPTER from whatever you have now to yammer;
  2. Remove adapter-specific settings like a Slack token;
  3. Add your Yammer token to the list: -e HUBOT_YAMMER_ACCESS_TOKEN=mytoken
  4. Add a comma-separated list of the groups: -e HUBOT_YAMMER_GROUPS=bots,bots-private

You don’t have to change anything else. That’s what your final script should look like:

$docker run \
--net bridge --detach=true -m 0b -e ST2_AUTH_USERNAME=chatops_bot -e ST2_AUTH_URL=https://aptwe:443/auth -e ST2_WEBUI_URL=https://aptwe -e NODE_TLS_REJECT_UNAUTHORIZED=0 -e ST2_AUTH_PASSWORD=x6hgOCD4mWGe9LuOpsXZg0cu4OkCOPNz -e EXPRESS_PORT=8081 -e HUBOT_LOG_LEVEL=debug -e ST2_API=https://aptwe:443/api -e HUBOT_NAME=hubot -e HUBOT_ADAPTER=yammer -e HUBOT_YAMMER_ACCESS_TOKEN=mytoken -e HUBOT_YAMMER_GROUPS=bots,bots-private -e HUBOT_ALIAS=! -p 8081:8080 --add-host aptwe:10.0.2.214 \
--name hubot \
hubot \

Save this script: a future system upgrade might override the settings, so be sure to have a backup. Restart Hubot:

service docker-hubot restart

Now log into your Yammer account and ask the bot for help:

Congratulations! Now you can use StackStorm with Yammer just like you would with any other chat service.


4. Acknowledgement

All this goodness wouldn’t be possible without the effort of many people contributing into what is now a complete integration story:

  • Aurélien Thieriot, author of the hubot-yammer adapter. He kindly agreed to let us maintain the module, while remaining a core contributor and the project owner. Pull requests are welcome, as there’s always work to be done!
  • Ron Huang made the adapter compatible with the current Yammer API.

  • Anthony Shaw of Dimension Data, a valued StackStorm Enterprise customer and a happy Yammer user, brought Yammer to our attention and, in a way, initiated the integration work. In recognition of his contribution over many months of working together we are posting this picture:

StackStorm Enterprise pro-tip: our Enteprise Support plan includes getting a Star Wars picture of your choice featured in our blog.

Finally, Team StackStorm is always available on the Slack community channel to help answer any of your StackStorm questions and resolve problems.

Love. ❤️

— Ed

The post StackStorm, Yammer, and cat pictures appeared first on StackStorm.

Automation Happy Hour #11 – Kubernetes Lifecycle Management of External Dependencies

$
0
0

Join us for or the next in the series of Automation Happy Hour events. This time we are talking about Kubernetes with one of the top experts on it.

Michael Ward is the Principal Systems Architect at Pearson responsible for leading technical design around enterprise Platform-as-a-Service based on Kubernetes. Prior to Pearson, Michael has spent many years in the industry in various roles including Chief of Site Reliability at Ping Identity, the Identity Security company. Take him for a beer and pick his brains on anything you like. You might even come away with something valuable. He is the speaker at the upcoming KubeCon in London and an uber-active members of the ST2 Community.

The post Automation Happy Hour #11 – Kubernetes Lifecycle Management of External Dependencies appeared first on StackStorm.

Improvments to ChatOPS Pack Development User Story in ST2 1.4dev

$
0
0

February 15, 2016
by Jon Middleton, Optimisation Project Lead @ Pulsant Limited

In the post StackStorm QuickTip: ChatOps your pack dev workflow James Fryman gave a ChatOPS alias recipe to reduce the friction for deploying packs and then in the Random Thoughts section asked:

This action is tied directly to the packs.install. What about a workflow? Seems like that would be a better way to structure this.

This resonated with me as I had already started working on an internal pack that did just that, as I thought attempting to deploy a pack via an alias (and action) contained within the same pack would be madness (or just lead to interesting race conditions). In the last week, our Pull Request has been merged, documentation has been included in st2docs (link) for a workflow that fulfils the above random thought and should be released with 1.4.

So introducing packs.deploy, an action written in Mistral to handle the mapping of names for Git repositories to the information required to carry out the packs.install action.

packs-deplploy-mistral-flow

The default configuration for the pack is setup to allow deployment of both st2contrib and st2incubator packs from ChatOPS.

Great! But can I use this to deploy my own Pack(s)?

Yes you can! All you need to do to set up packs.deploy so that you can deploy from one of your own repositories is to add the following to /opt/stackstorm/packs/packs/config.yaml under repositories: for each of your packs.

MyAwesomePackRepo:
repo: "https://github.com//my-st2.git"
subtree: true


If you don’t have a packs directory, just set subtree to false.

Right, I’ve Done That, How Do I Use it?

The ChatOPS command has been simplifed to the following (as the Git URL is stored in the config file):

! pack deploy {{repo_name}} {{packs}} {{branch=master}} - Download StackStorm packs via ChatOps

And the ChatOPS responses have been simplified too, so that it’s using the ChatOPS formatting from StackStorm 1.2:

image-pack-deploy-awsome

The Cool Stuff! A.k.a. automated deployment

The packs.deploy action can also be used for automated deployment, you just need to add the following to the definition above

auto_deployment:
branch: "master"
notify_channel: "my-chatops-channel"

And then set up an StackStorm rule that triggers packs.deploy with the right parameters (see the docs). There should be an example rule for BitBucket Server merged into BitBucket pack in st2contrib before the release of 1.4). Thus a checkin on master happens the action will run and the following will be posted in your notify_channel.

image-auto-deployment-changelog-message

Future Features?

This is another iteration of the pack deployment user story which further reduces friction. What else would be advantageous and supply another incremental reduction of friction?

  • A sensor for GitHub / BitBucket that can detect auto-deployments for repositories that contain more than a single pack and only deploy the ones that have changes.
  • Integration with Continuous Integration, so that only packs that pass are deployed.
  • Lock out other users from deploying the same pack from a different branch until it’s reverted to master, so features being tested are not reverted.
  • A queuing system for requested pack deployments, which informs the user when it’s their turn to deploy and that they may complete the process via a confirmation.

@Bot: Say _alas! ear wax!_ to complete your deployment of *AwesomePack* from *MyAwesomePackRepo* branch _Feature/factor-out-earwax-beans_.

@jjm: alas! ear wax!

@Bot: @jjm: Deploying *AwesomePack* from *MyAwesomePackRepo* for you…

  • A rule running from a timer that checks when a non-deployment branch (e.g. dev) was deployed, and automatically rolls it back to master after a
    configured amount of time (e.g. 1 hour).
  • Announcements of new features into #general in a more friendly and descriptive format than a change log.
  • If you’re using a private repository and using OAuth2 tokens these will be contained in the URL, which will then be placed in chat. This could be worked round
    with a new conf option and masking it from chat. However the token will still be stored in the Git config, so it may be best to use SSH deployment keys.

The post Improvments to ChatOPS Pack Development User Story in ST2 1.4dev appeared first on StackStorm.

The Brief History of ChatOps at StackStorm (and How We Got Here)

$
0
0

February 25, 2016
by Evan Powell

These days ChatOps has become all the rage. In this blog I’ll talk a little bit about how we came to be here – in a leading position when it comes to ChatOps adoption for operations. And I’ll point you to some resources from users and our own engineers to learn more.

The history lesson will be brief, I promise.

We started StackStorm after observing that existing solutions in the devops universe were generally point solutions, often evolved from scripts and other projects that DevOps engineers wrote to make their own lives easier. And that’s a great way to build a solution that appeals at least to those types of users for those specific use cases.

chatops

What we saw was that while there were leaders within certain segments amongst those tools, there was no clearly adopted pattern for the wiring that tied all these tools together. Moreover, with our backgrounds in enterprises we knew that wiring together extremely heterogeneous environments is always a challenge. The enterprise is more a brownfield than a greenfield.

A quick shout out to teams at Facebook and at WebEx Spark and all those other early interviewees that taught us so much about event driven automation. And if you want to join a non commercial Bay Area meet-up about the subject and hear speakers from organizations like Facebook and LinkedIn and Netflix, please join here:
http://www.meetup.com/Auto-Remediation-and-Event-Driven-Automation/ 

So – where does ChatOps join the story?

ChatOps is a huge movement in DevOps – and crossing into the enterprise. An analyst recently told me that 2016 is a the year of ChatOps and I tend to believe him.

To get going ChatOps experimenters are tying together one or two or three systems either directly into Slack or via Hubot, Lita, Err or another fairly friendly bot. And by doing so they are starting to experience the power of ChatOps.

It is what happens next, when they then try to tie together most of their environment, that they run into barriers. These barriers include:
Tying oneself too closely to a single chat vendor
Needing a little more smarts in processing what is happening before alerting, and often interrupting, the humans
Spending significant effort to integrate and then update integrations with underlying systems
Requiring human sign off and wanting that sign off to address an entire workflow, as opposed to a single step action.

In short – the reason that StackStorm is getting rapid adoption for ChatOps is that underneath your ChatOps – you need an event driven automation platform.

Here are some useful resources from StackStorm and other engineers about ChatOps:

As you can see, there are a lot of resources on the adoption of ChatOps including various patterns and considerations available on the StackStorm blog.

Thanks for reading. Please provide feedback. And if you have an idea for an interesting blog about your experience with StackStorm or ChatOps or event driven automation more broadly, please ping me directly @epowell101 or via the ST2 Slack community.

ph-evan

Evan

The post The Brief History of ChatOps at StackStorm (and How We Got Here) appeared first on StackStorm.

Viewing all 302 articles
Browse latest View live